
February 2nd is a day of crepes in France. Learn all about the holiday and some delicious recipes both sweet and savory.
Read moreLet's Make Croissants!

Happy Bastille Day! Here’s a French treat based in tradition.
Read moreTeaching in Door County
Door County is such a special part of our State. It’s the “thumb” of Wisconsin.
Read moreThe City I Love, Paris.
Paris! I'm back from the first tour, and so excited for the next one. The jet lag has worn, off and the suitcases are packed away. We had such a fun time. Here are a few stories and photos from the trip.
My deepest sympathies go to those affected near and far by the attacks on Paris. Our world needs peace.
Read moreSummer Breakfast
It's a perfect morning here in Wisconsin. It's the kind of day we dream about in January when it's too cold to go outside and your eyelashes feel like they're going to freeze.
Not this morning. The birds are chirping, the breeze in perfect and I got to enjoy fresh strawberries with yogurt and granola on my deck with a steaming cup of coffee.
I have a few favorite things I'd like to tell you about. I'll keep it short but they're very fun and may make your life easier.
Read more
ALT Summit and Sweet Paul Makerie

What an exciting Spring! I spoke at ALT Summit and had a blast at the Sweet Paul Makerie. The Utah mountains provided a gorgeous backdrop for the week. What make it even better a delicious Strawberry-Rhubarb Coffee Cake recipe. This time I've made it gluten free.
Read moreUW Writers' Institute and Other Fun Events

Happy belated St. Patrick's Day and Happy Spring!
As I write this, I'm looking out the window at snow. It's Spring, and the snow won't last long but it would be really nice to have our warmer temperatures back. I'm ready for crocus, daffodils, tulips, and muddy dog paws. There are so many fun things coming up, and I want to be sure you know about them.
Read moreThe Little French Bakery is going to Paris!

Oui! You've read that correctly. It's going to be so exciting! I'm heading to Paris in October and this time you can join me.
We'll eat, tour and shop our way around Paris enjoying all my favorite culinary delights. Burkhalter Travel is making all the arrangements for us. If you live somewhere other than the Madison/Baraboo area, I'm sure they'll help you figure out a way to meet us, or leave from your city.
At tomorrow night's BRAVA Salon event, Denise from Burkhalter Travel will be there to answer questions and tell you all about it. Then, on March 25th, we'll have a information session at Burkhalter to meet and talk more about the details.
Read moreSummer Southern Biscuits

Biscuits and Jam
Happy Fourth of July weekend! To celebrate, I've made all-American biscuits with Strawberry Jam. We don't eat a lot of biscuits here in the northern states, but we certainly enjoy them. There are many not-so-good (think hockey puck) biscuits. I think mine were pretty good. They were light, fluffy and had a really nice flavor.
Early this Spring, Gary and I traveled to the South on a road trip. One of our stops was Charleston, South Carolina. We enjoyed a delicious dinner was at Poogin's Porch. Upon arriving, we were presented with a basket of light, fluffy biscuits. I became obsessed with biscuits and set off to find the secrets for making them, just right.
As luck would have it, our hotel had a Southern Living Magazine. One of the articles was on making biscuits. I've used those tips, with others, to make some pretty darn good biscuits.
Another one of our stops was Chattanooga, Tennessee to see our friends, Jerry and Nancy. I needed Martha White Flour, and my guess was I needed to pick it up before heading home if I wanted to find it. Ta-da! I quick trip to a market and I had just what I needed. As an aside, downtown Chattanooga has some great new restaurants.
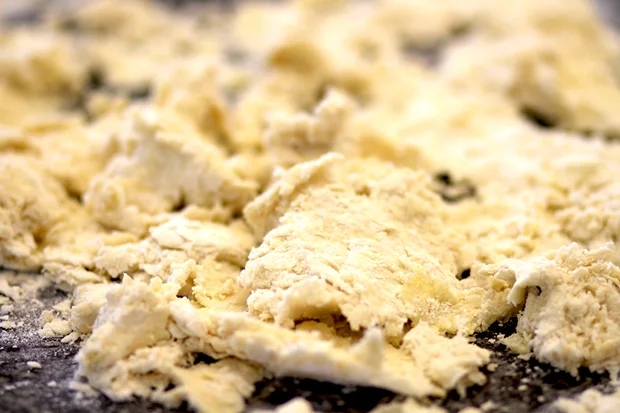
Back to business. The biscuits are made with flour, cold shortening, sugar, baking powder and buttermilk. To put the finishing touch on the biscuits, I'm topped them with homemade strawberry jam from my friend, Dana. She picked the berries about 1/2 mile from my house. It's SO pretty and delicious!
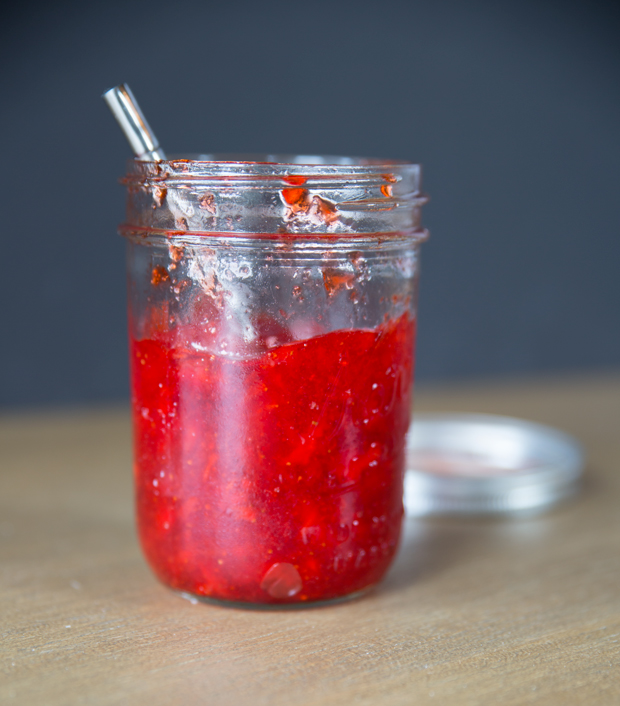
Dana's Strawberry Jam

Biscuit Ingredients
To make the flour as light and well-mixed as possible with the other dry ingredients, I used a tamis, or French sieve. Any sifter will do. I sifted three times.

tamis
Here the tips for making biscuits:
1. Be sure all the ingredients are cold.
2. Handle the dough as little as possible.
3. Make a claw shape with your fingers and use them to stir in the buttermilk.
4. Dip the biscuit cutter in flour, press straight down, and pull up. Don't twist the cutter.
5. Place the biscuits "shoulder to shoulder"on the baking sheet so they rise and don't spread out.

biscuit-dough

biscuits

Breakfast Tray
To print recipe click HERE
Recipe: Southern Biscuits
5 cups self-rising flour (I used Martha White)
2 cups buttermilk
1/4 cup granulated sugar
2 tablespoons baking powder
1/4 pound (113 grams) cold shortening
Preheat your oven to 375 degrees F. Sift together the dry ingredients. Add the shortening and crumble together with the flour mixture until the shortening is in pea to marble sized pieces. Add the buttermilk in three additions, gently used your fingers to mix, until just combined.
Pat the dough on to a lightly floured surface. Gently roll the dough to 1 inch thick. Dip a 2 inch cutter into flour, then press into the dough to cut, pull straight up/out. Repeat to cut the about 16 biscuits. Place on parchment lined baking sheet. Bake 12-14 minutes until golden brown. Brush with butter when just out of the over if desired.
I've got lots more to tell you about our trip. Have a great holiday weekend. Be safe and be kind.
Irish Seafood Chowder and Cheddar Scones

Happy St. Patrick's Day! Here are some authentic recipes straight from Ireland.
Read moreFood Styling and Photography in Ireland

Last week I had the great fortune of attending an Angela Ritchie Ace Camp, in East County Clare, Ireland. Our instructor was Béatrice Peltre. This was my first trip to Ireland. It's a beautiful, beautiful country. The landscapes, the people and feelings you get as you travel are like no other. I don't want to bore you with 900 photos, but I'd love to share a sampling of my week. I flew into Shannon, and stayed one night to shake off my jet lag. The Carrygerry guest house not too far from the airport. As I stepped out of the cab, this was my view. The answer to the question, is Ireland really green?

I noticed all the blue and yellow banner flying in front of businesses and homes. It's to celebrate the upcoming Hurling Championship game in a few weeks. Country Clare is in the match, and it's not to be missed. The Irish are crazy about Hurling.

After a warm, hearty dinner and a good sleep I was off the next morning to meet my classmates at the Caher House near Feakle. Yes, after asking several locals, it's pronounced just the way it looks. But with a nice brogue.

This grand home was my home away from home for the class. We walked, talked, and learned so much about food styling, the ins and outs of food photography and many other tidbits. If fact, we created a Sharing List, to document all the movies and odd & ends that came up in conversation, but we knew we might forget. Thirteen women have a lot of conversations!

Our first morning we walked to see the chickens and horses, and explore the property. We discovered wild blackberries which would come in handy for our food styling exercises later in the day.

Our first styling exercise was styling a cute little jar of yogurt. Sounds simple? Add the spoon and the lighting with a pretty cloth and I had my work cut out for me. Here's my final result. We made a few more trips to the grocery store to pick up more jars. They'll come in handy for other photos. The best part is they all made it home in once piece.

Bea (pronouced Bay-ah) presented demonstrations and ideas for styling desserts, cheeses, meats and cooked foods. Always natural light, and getting the food positioned just so. Not too much, just right.

It was great fun working in pairs to style our own versions of the foods. Sometimes the food and sun cooperated, sometimes the sun went behind a cloud and changed our plans. Here are some of my shots.


One afternoon just before dinner a few of us piled in a car and were taken by the grounds/animal keeper to the other side of the lake. The views were stunning. As were drove down the single land road, we came upon a herd of wild horses. They were as interested in us as we in them.


Our field trips included a trip to an organic goat cheese factory complete with goats. It's a very small facility producing great cheese.
Normally, the goats are out grazing but the day of our visit it was raining. The goats preferred to be inside so they were treated to fresh cut lush green grass.

After my week ended, I traveled back to the Carrygerry House joining my cab driver, Finbar, for an afternoon trip around County Clare. He grew up in the area and had many ideas for things I should see before I left. My first order of business was a pair of Wellies for home. We had found several guest pairs in the basement of the Caher house and wore them into the woods and out and about on rainy days. With my country life, I thought they'd come in handy here in Wisconsin too.
Finbar stopped to ask a friend where he thought would be a good spot to find Wellies. They concurred it would be Dan, Mac & Ernies. Sounded like a good spot. They told me it has lots of farming equipment and would surely have authentic Wellies. We drove into Ennis, and pulled into the farm supply store. Silly me. It wasn't Dan, Mac & Ernies. It was Dan McInerney's! I kept my phonetic spelling to myself.


We quickly found the boot section. All the styles were lined up in a row. I tried on a few pair to find my size, finding the perfect pair. I was now the proud owner of real Wellies. No, I didn't wear them out of the store, but I did put them on in my room to test them out before I packed them for the trip home!
After some gorgeous views, touring an Abbey, and seeing many ancient sites on the area, it was time for a bite. To accompany my seafood chowder, I had a hard cider. I'm including a shot of my first Guiness too. Delicious!

I'm looking forward to my next post where I'll make Seafood Chowder and Cheddar Scones for you. The recipes are on their way from the Carrygerry House Chef and his wife, Gillian who own the Inn.
Finbar drove me to the Cliffs of Moher, one of the most beautiful places I've seen. The Atlantic is all its spendor. The area is now a National Park with safety rails and a Visitors Center. Finbar showed me the spot near the edges of the cliffs where he had picnics as a child.


It's great to be home and putting my new skills to work. A special thanks to Angela Ritchie of Ace Camps, Allison our talented chef, and Beatrice Peltre for her talent and great teaching skills!
Dacquoise au Cafe (Almond Merengue with Coffee Butter Cream)

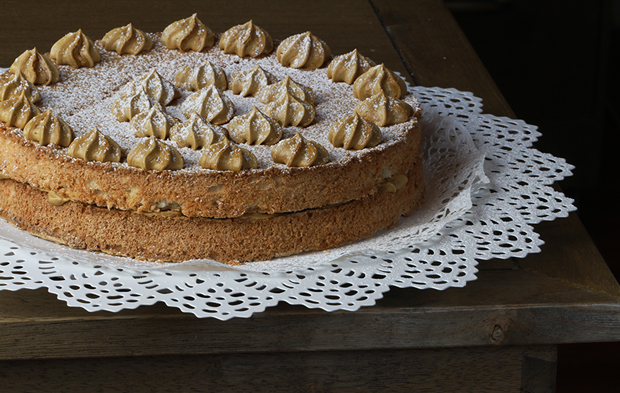
Dacquoise du Cafe
Every year about this time I get a little sentimental. Perhaps more than a little. Fifteen years ago I arrived in Paris ready to begin a journey that changed my life. There's something about the sights and smells of late summer that trigger the memories of walking to the Metro each morning, with excited and nervous butterflies in my stomach. What amazing technique and pastry were we going to learn? Would I be able to understand the Chef? And, could I get through the day blunder free?
The day we made this pastry in class, it was an evening kitchen session. Our main chef had gone for the day and we had another chef, from another school guest teaching the class. I sound like a broken record, but once again he was very handsome and had even better cologne than the pastry cream chef. To top is off, he wasn't wearing the usual navy blue houndstooth checked pants. His pants were navy blue pin striped. Kim and I secretly called him Fancy Pants. He was very nice, and very helpful. (Can you see the crush coming?).
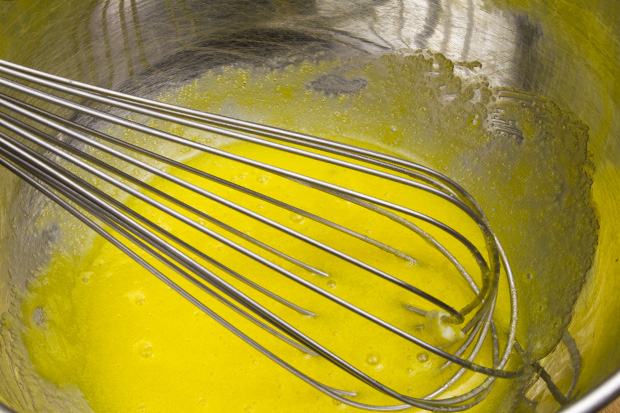
Our class gathered our ingredients and proficiently made the dacquoise without fail. Then came the cream de beurre, or buttercream. Since we didn't use mixers, we needed to bring the sugar and water to the soft ball stage, and somehow pour it over the egg yolks waiting in the bowl at our work station, a distance of about seven feet.
The chef, Kim and I had been chatting (in our best caveman French),trying to be welcoming to our guest. While I was bringing my sugar to temp, he walked over to make sure the next step was successful. I remembered earlier in the day that our Chef had shown us a way to measure the sugar stage by dipping a flat sieve/skimmer into the sugar and blowing into it. If you can make bubbles, out the back, your sugar is at temp. Amazing. I asked our evening Chef about it, and he said "Oui!" So I gave it a try, and to my amazement, it worked. Now I had sugar at the soft ball stage ready to pour it on the yolks. The chef stood beside me... and I froze. "Je poulet, Chef", I said. I wish I could show you the look on his face. Just think about the look a dog gets when you talk to them and they tip their head to the side. Happy, but completely confused. "Poulet?", he said. My friends across the room roared with laughter. I was trying to tell him I was chicken. Guess what? That means nothing in French. One of my French speaking classmates came to my rescue and explained to the Chef that I was afraid to pour the sugar. He smiled and chuckled. I poured the sugar, and began whisking the mixture until it cooled and then added the butter. The buttercream was quite possibly the best thing I had ever tasted. Smooth and rich with the hint of coffee. And best of all, I had just made it.
While we were working the Chef demonstrated how to make marzipan roses using the back of a tablespoon. In addition, he made a few small animals, often seen in patisserie cases.
We assembled our desserts and presented them to the Chef for grading. As we were boxing our dessert and preparing for the Metro ride back to the hotel, the Chef walked up beside me, and with the biggest smile, set a little marzipan chicken of the workstation. "You are my favorite Chicken", he said. "Merci, Chef", I replied and I'm sure blushed six shades of red. I still teach students how to make roses, dacquoise and buttercream. And best of all, when Kim and I are together we often reminisce about Fancy Pants.
I've been wanting to share this recipe with you for a long time. It's an incredible dessert. It's pure classic French pastry. Simple ingredients combined together to make compenents. Combined together, you won't believe how elegant yet understated it tastes.
Dacquoise is a nut based merengue sponge cake, which make it naturally gluten-free if that's important for you. You can use all almonds, hazelnuts or a mixture. The key is to make great egg whites.
Start with almond flour, sugar, a dash of salt, a dash of cream of tartar and eggs whites.

Before and After Baking Dacquoise
For the very best merengue, start with eggs whites at room temperature or just a bit above. Start whipping them slowly, then gradually increase the speed. Once they reach soft peaks, add the sugar all at once and increase the mixer speed (or find a new set of arms if you're whisking by hand), and whisk until the peaks are firm and shiny.
Fold in the nut mixture, then spread in a ring, or a springform pan ring. If you don't have either one, just draw two 10 inch circles on a piece of parchment paper.

Dacquoise just removed from the rings
I highly suggest waiting until the dacquoise is cool before starting the buttecream. That way, there's no chance you'll be tempted to pipe the buttercream on warm cake.

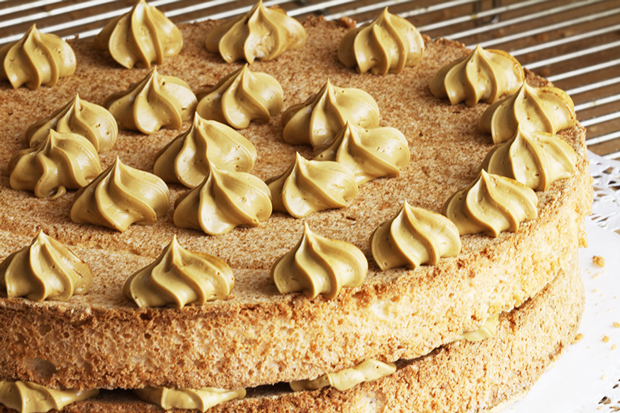
Pipe one layer with rosettes of butter cream
Dacquoise just before adding a dusting of Powdered Sugar
Be sure your butter is at room temperature. Heat the sugar and water in a saucepan to 238 degrees F, or 118 degrees C. Pour the hot sugar over the whisked egg yolks and whisk until lightened and cool. Then start whisking in the butter bit by bit. This is much easier with an mixer, but it can definitely be done by hand with a whisk. You may need a helper to hold the bowl while you whisk in the hot sugar so your bowl doesn't scoot away.
To finish the dessert, use a thin knife with the blade pointed toward the edge of the pan, and carefully cut the cake away from the edge. Place on a plate, and pipe several rosettes of buttercream. Be sure to pipe a ring of rosettes near the edge. Set the next layer on top and garnish with more rosettes of buttercream. If you have some chocolate coffee beans, or nuts, add one to each rosette.

Dacquoise Cafe
Serve immediately, or chill and serve.
I hope you'll give this recipe a try. If you've never had real French buttercream, you're in for a treat!
To print this recipe, click HERE
Dacquoise
Makes two 10 inch circles
8 egg whites plus 80 gm granulated sugar (6 1/2 TBSP) -to make merengue at the end of whipping
140 gm (1 2/3 cups) almond and/or hazelnut flour
60 gm all-purpose flour (2/3 cup) OMIT IF MAKING GLUTEN FREE, and substitute almond flour
1 dash salt
1 dash cream of tartar
100 gm (3/4 cup) powdered sugar
Preheat your oven to 350 degrees F. Line baking sheet with parchment paper. Bring the egg whites, cream of tartar, and salt to soft peaks. Add the sugar and increase speed until firm, and glossy peaks. Fold in the nut flour. Spread in the rings, or spread in the circle, about 1/2 - 3/4 inch thick. Bake for 30 minutes, until golden brown. The dacquoise will rise and then settle back into the ring. Cool completely. Peel off the parchment paper, and carefully remove from the rings.
For the Buttercream:
4 egg yolks, from large sized eggs
200 gm butter (14 tablespoons), at room temperature
230 gm water (just less than 1 cup)
170 grams confectioners' sugar (1 1/3 cups)
In a mixing bowl or the bowl of a standing mixer, have the egg yolks ready. Be sure the butter is at room temperature.Have In a small saucepan, place the water, then the sugar and heat to 238 degrees F. Use a candy thermometer to check the temperature.
When the sugar/water reach soft ball stage, slowly pour it over yolks, whisking continuously. Continue whisking by hand or with the whisk of the mixer, until the mixture is cool. If you feel the bottom of the bowl, you'll feel that the mixture is cool.
Add the butter one to two tablespoons at a time, incorporating well after each addition. If the mixture breaks, keep mixing. It will come back together. Add the coffee extract to taste. The buttercream should be a rich coffee color, with a nice coffee taste.
French Coffee Extract (Essence de Cafe)
200 gm granulated cane sugar (1 cup)
200 gm water (7 oz)
100 gm instant coffee (1/4 pound or 1 7/8 cup) Nescafe is best
Dissolve the instant coffee in the water and bring to a boil. In another saucepan,add the sugar and heat to cook until very dark caramel color (very dark amber). Stop the caramel by adding the hot coffee. The mixture will bubble, spit and sputter. Be very careful to protect your hands and fingers. Add the coffee slowly, and stir lightly to dissolve any hard caramel bits. Strain the mixture and cool. Pour into bottles, and store in refrigerator.
Door County Cherry Pie

If you hold up your right hand, palm facing you, it's the quick reference guide to locations in Wisconsin. Follow the bottom of your thumb to the middle of your palm and that's where I live. Chicago is down at your wrist. And the thumb? Well that's Door County. The peninsula juts out and separates Green Bay and Lake Michigan. Green Bay (go Pack!) is at the bottom of your thumb followed by Sturgeon Bay, Egg Harbor, Fish Creek, Sister Bay with Gills Rock at the tip. My parents and grandparents grew up in the Green Bay area and spent lot of time in Door County. As kids we spent at least one week there each summer camping in Peninsula State Park. A gem of the Wisconsin State Park system. Every family has their favorite spots. We spent days on the lake side swimming in cold Lake Michigan at a tiny county park.
Door County is famous for several things. Just to name a few... 1. Beautiful beaches and sunsets 2. Scandinavian Restaurants and Culture 3. Fish Boils 4. Cherry Orchards 5. And last but not least, Cherry Pie

Cherry Pie
It's safe to say that 99.9% of Door County restaurants have a cherry dessert on their menu. Most have a cherry pie served warm with ice cream.
Orchards sell freshly picked cherries and many have pick-your-own. Shortly after we were married, Gary and I visited Door County. I couldn't wait to show him Sand Bay Town Park, the goats on top of Al Johnson's Swedish restaurant, take the ferry to Washington Island, and pick cherries. It's easy I told him. We just get buckets, reach up in the trees and fill our buckets with the tart, bright red fruit. Our trip was great and the cherries were abundant. We quickly picked a few buckets and brought them home for family and a few pies.
The last few years have been tough on the cherry crop. Early thaws followed by sudden snow and storms have made the harvests small to non-existent. This year is a great year. The long spring brought many blossoms. The trees are full of cherries! Last week our friend made a trip to the peninsula and brought home a bucket of cherries.
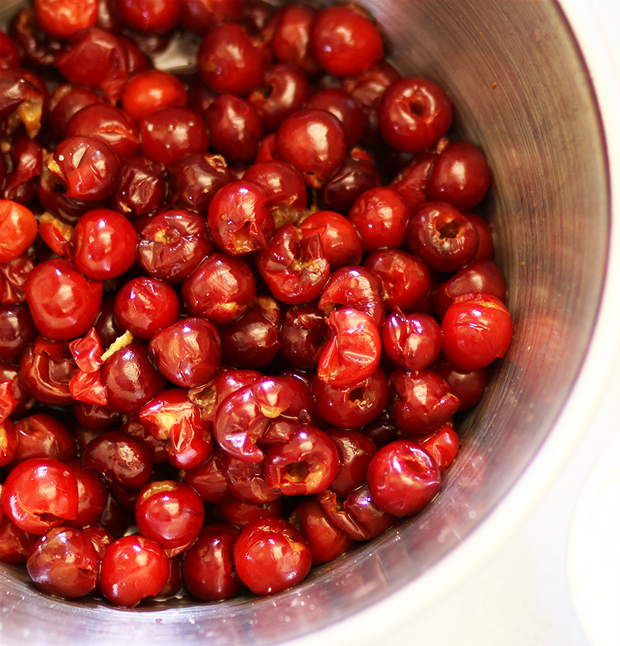
Tart Door County Cherries
For those of you close enough to get in on cherry season, here's a pie recipe. For those too far away, pick up a bag of frozen cherries and join the fun. Even if you've never make a pie. Let's do this!
First, you'll most likely need to pit the cherries. If you have a cherry pitter, you're in business. If not, a hairpin or paperclip will work. Slide the rounded end into the top of the cherry and pull of the pits. Pit the cherries over the cherry bowl so you save some of the cherry juice.
I know what you're thinking. The pie sounds great, but a crust? I'm including an all butter crust recipe for your called Pate Brisee. If you're not quite ready for that, it's a-ok to purchase a refrigerated crust. The crust will happen one day.
If you're making the Pâte Brisée, you'll cut the butter together add the wet ingredients into the well and chop the dough together. Here's the dough lined up, just before it gets smeared on the counter to combine.

pate brisee in process
Then using a technique called Frisee, the crust is smeared between the heal of your hand the work surface to layer the flour and butter. The butter will melt in the oven and push the layers of flour apart, creating a flaky, tender crust.
frisee of the crust

pate brisee crust
I added a few blueberries to the cherries to make the crust a bit fuller. Here's the fruit just before it went into the pie crust.

cherries-and-blueberries
To print this recipe, click HERE
Pâte Brisée (Sweet Pastry Dough)
Makes one 10 inch tart crust (double recipe for 2 pie crusts)
Ingredients:
200 g flour
100 g butter, cold
20 g sugar
1 egg
4 g salt
1 TBSP water, cold
vanilla - a dash if desired
Using a knife or bench scraper, cut the butter into 1/2 inch pieces. On your work surface, make a pile with the butter and flour. Cut the flour and butter together until you have pea sized pieces. Work quickly so the butter does not get soft or warm. Gather the butter/flour mixture and make a circle with a well in the center. It will look like a flat wide volcano, with a three to four inch open space in the center. The chefs called this a fountain. Into the center add the water, egg, sugar and salt. With your fingers, swish these ingredients together until you feel that the salt and sugar are dissolved. Using the pastry/bench scraper, cut the liquid into the flour and butter. This is when you’ll find out if your countertop is level! The mixture will be shaggy and streaks and bits of butter.
Line the dough up in a long row (left to right) in front of you. The line will be about two inches thick, an inch high, and about twelve inches wide. Using the heel of your hand, smear the dough straight ahead across your work surface taking about 1/3 of the line of dough each pass. Work left to right ... or right to left. Once all the dough has been smeared, gather it back into the line and smear again. You’ll make about two to three passes. There will still be a few streaks of butter in the dough. Flatten the dough into a disk about 6 inches in diameter and 1/2 inch thick. Wrap the dough in plastic wrap or parchment paper, if you plan to use the same day. Chill the dough in the refrigerator for twenty to thirty minutes.
Here's a tip: The French term for smearing the dough is fraiser (freh-zey). Rather than mixing the dough, it creates layers of butter and flour. When the butter heats, it melts and becomes steam which pushes the layers of flour apart creating a nice flaking crust. Keeping the ingredients cold and chopping rather than mixing will keep the dough light and flaky. Over working the dough will develop the gluten making the dough tough and elastic. Resting the dough will make it much easier to roll.
Door Country Cherry Pie
Ingredients:
4 cups pitted tart cherries
1 1/2 cups sugar
4 Tbsp cornstarch
1/2 tsp almond extract
1/2 tsp salt
1 Tbsp heavy cream
1 Tbsp granulated sugar to sprinkling on the crust
1 batch double crust pie dough - your choice
Preheat your oven to 400 degrees F.
After the cherries are pitted, drain off most of the juice, and add the cornstarch, sugar, salt and extract. Allow to rest for about 10 minutes.
Roll the bottom pie crust and place in the bottom of the pie plate. I would recommend a 9" pie plate, not too deep.
Place the cherries and most of the juice in the crust.
Roll the top crust and drape over cherries. Trim the top crust about 1/2 inch past the edge of the pan. Turn it under the bottom crust and with your index finger and thumb of one hand, press and pinch the crust around the other index finger. Make five or six inch slits on the top of the crust.
Brush the crust with heavy cream and sprinkle with sugar.
Place the pie on a parchment paper or silicone mat lined baking sheet. Bake at 400 degrees for 20 minutes. Reduce the heat to 350 degrees F, and bake until juices bubble out the top slits, about 30 minute more. If the crust starts to become too brown, tent the pie with foil or just make strips of foil to protect the edges from becoming too dark. Cool completely. It's best to serve a pie the day after it's made so the juices can thicken. You'll have a much prettier piece of pie.
Let me know your favorite Door County memories!

closeup cherry pie
If you're heading to Door County, here are some of my favorite spots.
The Whistling Swan - A beautiful Inn and Restaurant.
The White Gull Inn - Another great place to sleep and eat.
For libations, try JJ's La Puerto (Door, get in?!), Bayside Tavern, of the C&C Supper Bowl
The best smoked fish in Door County is at Charlie's Smokehouse, Gills Rock
The only place I've ever picked cherries is at The Cherry Hut
For a fun day trip, head to Washington Island. Just a ferry ride away.
For more on Door County...
Be safe and be kind. Happy Travels!
Bonjour!

What a month this has been! There's so much to tell you. First, I'll tell you the really big news. Early this Spring, I presented a book proposal to a publisher who loved it! We've signed the contract so in 2014 I'll have a cookbook. The book will have the recipes I teach here at The Little French Bakery with many others. I'll be doing the photography and adding stories with the recipes. As the writing and editing progresses, I'll keep you posted with details of the book's release. It's incredibly exciting. It will be published by Skyhorse Publishing, New York.
What else? Recently, we were in France, on a barge with friends cruising on the Canal du Midi. Our barge was named Emma. The hosts, crew and views were wonderful. I'll be writing more on the barge life in a future post. I had every intention of blogging on our trip but due to technical difficulties, (a brain cramp on my part) I couldn't get to my blog to write using my Ipad. I debated about bringing my laptop and didn't. Big mistake. I've missed writing, but I have so much to show and tell. Our trip also included a weekend in Bruge, Belgium and several days in Paris before and after the barge trip. We had time to walk the streets and take it all in. There are so many great places I've wanted to tell you about, and now I have photos to help.
Here are just a few of my favorite sights from Paris. My postcard to you.
Cafes. I love the chairs, tables, place settings, and ambiance. The streets were lined with tables filled with Parisians and tourists soaking up the sunshine.
A Fromagerie. Cheese as far as you can see. The smells are incredible (as long as you like cheese!) We had just come off the barge where we enjoyed many great cheeses. It was a treat to look in the case and recognize some of the names of cheeses that were new to us. A new favorite, Mimolette. Bright orange, sharp and crumbly. It looks like of like a cantaloupe. It's in some cheese shops. I highly suggest picking up a small piece. to try. I can't write about cheese without mentioning Morbier. A beautiful semi-soft cheese with an ash layer separating and layers of cheese.
And of course, the Tour Eiffel. When we checked into the hotel for part deux, the receptionist at the Madeleine Hotel asked if we would like to be on the floor that views the Eiffel Tour. She didn't have to ask twice. The third frame is the view out our window at dusk. When we got back to our room after dinner, I sat on the edge of the bed with my camera for a least an hour watching the color of the sky change and took too many photos of this view- if that's possible. I woke up in the middle of the night and looked back out again for a few minutes. It's a view that I never tire of. Gorgeous.

Favorite sights in Paris
And who can get tired of seeing and tasting macarons? Not me! Our friend stopped by a patisserie and picked an an assortment for the train ride. Here they are. So pretty and so delicious. Did you know that only the middle of a macaron has the flavor? The color is just for suggestion (except for the chocolate ones). These were especially colorful.
macarons
One of the highlights of our time in Paris was a meal at Benoit, an Alain Ducasse restaurant. We went to lunch and had great cassoulet, a delicious bean and meat stew. It's the best I've ever had. Okay, I say that every time we go there. After the meal, as we were having coffee, our waiter stopped by with the tray of just-out-of-the-oven Madeleines. They were perfect. It was so fun taking them from the pan tray rather than having them served on a plate. It was like sneaking them from the kitchen before they were ready to be served. Here's my quick snap shot.

madeleines
Now you can make Madeleines too. I like them left out overnight so they're crunchy. Others like them soft, right from the oven. I think the second bite is always the best. If you need a mold, check with a local kitchen shop. Most stock them. Just ask for a Madeleine pan.
To print this recipe, click HERE
Madeleines
- 200 g melted butter (14 Tbsp) (cool and allow solids to settle )
- 4 eggs
- 170 gm granulated sugar (3/4 cup plus 2 Tbsp)
- 1 pinch salt
- 10 gm honey (1 Tbsp)
- 5 gm baking powder (1 tsp)
- 180 gm flour (1 3/4 cups plus 1 Tbsp.)
Melt butter and cool.
Sift flour with baking powder. Mix sugar and eggs to near ribbon stage. Add vanilla, lemon/orange zest. Add flour. Fold into egg/sugar mixture. Add honey. Add butter, leaving milk solids in container. After mixing, place in refrigerator to cool slightly/stiffen. Butter molds well, then flour. Place molds in refrigerator to firm butter if necessary. Use a pastry bag if needed to fill molds about 2/3 full in an oval top to bottom in the center of the mold. Bake at 350 for about 6 minutes or until puffed and golden. Immediately tap/rap on counter to knock madeleines out of pans and cool on wire rack. 1 recipe fills 2 molds.
If you're heading to Paris, be sure to check out my Paris Notebook. There are suggestions on places to go, eat and help with shopping for cooking equipment and more. I'll be adding more info and photos our most recent adventures.
Be kind, and enjoy!
Crepes (With and Without Gluten)

Let’s celebrate the French February 2nd holiday - La Chandeleur
Read moreMocha Chocolate Chunk Cookies

Every now and then a recipe comes along out of the blue that sweeps me off my feet. I was in the bakery catching up some Tuesdays with Dorie recipes when POW theses cookies came along. Soft, crunchy, chewy, chocolaty, a hint of coffee... I love them.

For those of you who are new to my blog, I'm part of the group of bloggers who are baking our way through the book Baking with Julia, by Dorie Greenspan. Twice a month we make a recipe and blog about it, linking to the big site Tuesdays With Dorie. We get to make recipes we may not have otherwise tried, and some that we've made lots of times. You'll always have link to the host for the week who provides the recipe. You might even peek ahead and bake along with us. You're always welcome to join me and comment on your baking successes...or challenges.
The recipe calls for dried apricots. I usually have some around, but not today. As I looked through the cupboard, I found a big bag of dried plums - better known as prunes. They were soft, and plump and with the dark color, perfect for the cookies.

Another wonderful attribute to the recipe is that it calls for chocolate which is chopped rather than chips. I used chopped dark chocolate 58%. Some big chunks, dust, and little pieces. I prefer chocolate chopped rather than chips in most cookies.
The recipe assembles easily. Cream the butter and sugars, add the eggs, stir in the dry ingredients, then the chopped prunes and chocolate. My dough was still very cool after it was mixed so I didn't chill it as the recipe suggested. The cookies baked to a great color in 12 minutes, just as directed.

There's no need to squish or smoosh the cookies. The balls of dough are about the size of ping pong balls.

The fruit disappears into the dough and adds a texture and sweetness which compliments the coffee and chocolate. As we wait for the arrival of spring and temperature to warm, these will warm your heart. Enjoy!
You can find the recipe at Galettista by our host Peggy.
Cheating on Winter Pea Soup - French Fridays with Dorie


Pea Soup
Today's from Around My French Table by Dorie Greenspan is quick, very easy, and surprisingly delicious.
It's hard to cheat on winter right now. It's very present. Will it snow? Not snow? Did we get missed by the storm? It's pleasantly snowing with no sign of Spring. Except for this sweet pea soup. I used frozen baby peas which are my favorite.
I'm guessing that right now most of you could make this soup without a trip to the grocery.
- Frozen peas . Check
- An onion. Check.
- 2 Tablespoons (or so) butter
- A can/box or frozen chicken stock. Check.
- A few leaves of lettuce. Check
- Salt and Pepper. Ready to go!
And best of all. Do you have 15 minutes? Yes, I said 15 minutes.
Just sauté the chopped onion in the butter, add the vegetables and seasoning. Now simmer for 10 minutes. I have you 5 minutes to gather the ingredients and chop the onion. After simmering, puree in your food processor or blender (being very, very careful). That's it! You have a lovely, sweet, bright soup. And because it's pureed, it always feels a extra fancy.

Rain Coast Crackers
Did you see the pretty crackers on the side of the bowl? I'd like to introduce you to Rain Coast crackers. They're from Leslie Stowe Foods, made in Canada. These are Salty Date and Almond. I love them with soft cheeses. Alone, they were perfect with the soup. These are gluten-free if that's important in your diet.

soup
Here are the details adapted from Bon Appetit
To print this recipe, click HERE
Cheating on Winter Pea Soup
Ingredients
- 2 teaspoons butter
- 1/2 cup coarsely chopped onion
- 3 cups (or more) low-salt chicken broth or vegetable broth
- 8 ounces sweet baby or frozen peas (do not thaw)
- 4 cups sliced romaine lettuce (1/2 of medium head), or 1 heart of Romaine
- Crème fraîche or sour cream, for garnish if desired
- Crumbled cooked bacon
Melt butter in large saucepan and sauté onion until soft. Add broth and bring to boil. Stir in peas and lettuce. Reduce heat and simmer uncovered for 10 minutes. Puree soup in blender until smooth, working in batches. Reheat soup by returning to saucepan, and thin soup with extra broth if necessary. Garnish with creme fraiche and crumbled bacon if desired. Makes about 4 servings.
Have a good weekend. Be safe, and be kind.
Brandy Old-Fashioned

A Wisconsin tradition. Here's how to make this this classic cocktail.
Read moreValentine Cookie Swap

Happy Valentines's Day! I love Valentine's Day. I've always loved it. From elementary school shoe boxes filled with sweet notes from classmates, to a Valentine Card and little present on the kitchen counter from Gary, I love it. One of my favorite memories was walking into our kitchen for supper when I was about 8 on Valentine's Day. My mom had hung lime green polka dot patent leather tote bags on the backs of our chairs. The bag had a sleeve on the outside that held a matching umbrella. So sweet. And so Doris Day! Another reason I love Valentine's Day? It's Eddie, my dog's birthday. Yes, we talked about naming him Romeo, Valentine, and many other more romantic names, but he was and always will be, Eddie. Here's the birthday boy. He's 1/2 German Shorthair and 1/2 Blue Heeler. And quite a guy. Today he's seven, and acts like two.

eddie
Our French Friday's with Dorie group decided to have a cookie swap to celebrate the day. The swap was organized by Alice. (Thanks, Alice!) We each got the name of the Valentine, and made them a dozen cookies. The box also included a recipe, and a little present.
My box arrived, and was so fun to open! Susan Lester had my name. Inside the big box was TWO boxes of delicious cookies, a pretty ceramic heart, complete with rose petals, and a tres jolie Valentine. Thanks, Susan! Her blog is CreateAmazingMeals.com She knew just the right theme. An Eiffel Tower and I'm in!

CookieSwap Box
The cookies are fantastic! Chewing, very flavorful and perfect for an evening snack. Ok, I ate two right away and am tempted to have another very soon!
Here's the recipe from Susan:
To print this recipe, click HERE
Inspired by Marcel Desaulniers “Mrs. D’s Chocolate Chip Cookies” from Death by Chocolate Cookies.
Preheat oven to 300 degrees F.
In a stand mixer, at medium speed, for 4 minutes, cream
½ pound Butter, softened
2 cups Dark Brown Sugar
When light and fluffy, scrape down the sides of the bowl and blend in:
2 teaspoons Vanilla Extract
1 Tablespoon Dark Rum (we use Myer’s)
2 Eggs
When thoroughly blended, add:
4 cups All-purpose Flour (we use King Arthur)
½ teaspoon Salt
1 ½ teaspoon Baking Soda
Start on low speed, slowly increasing to medium-high.
When dry ingredients are completely mixed in, add:
2 cups Semi-sweet Chocolate Chips (we use Ghirardelli)
1 cup Walnut pieces
1 cup Pecan pieces
Drop cookie dough onto parchment paper-lined baking sheets (about 1 ½ Tablespoons).
Bake for 25 – 30 minutes, according to your preference.
Recipe from: www.createamazingmeals.com

chocolate chip cookies
I hope you'll make these and visit Susan's site for more recipes and ideas. Happy Valentine's Day! Be kind.
Pastry Creme (Crème Pâtissière)


Pastry Cream in Puff Pastry
As I prepare to leave for Paris it seems like the perfect time to tell this story. It's always fun remembering my days at Le Cordon Bleu. I hope you'll enjoy.
The March to the Poubelle
Our Basic Pastry Course was in the intensive format meaning that we took 3-4 classes each day instead of 1. It condensed 12-14 weeks of curriculum to just three. It truly was intense. We would be in the lecture room then immediately run downstairs to the kitchen to prepare at least one or all of the recipes the chef had just demonstrated, then back to the classroom. The days started at 8:00 am, and went until 8:00 pm. Some days included a free time block to run an errand, or in our case to do a little shopping and or eating. Both activities were highly encouraged. After all, how were we to learn what great pastries looked and tasted like?
The chefs in the school worked a French workweek (35 hours), so we had to have a combination of chefs to cover our long days. Our main chef instructor was off for the evening and bid us farewell. Another chef, who happened to be a Cuisine program chef, was going to oversee our kitchen preparations. All the chefs were very distinguished and impeccably neat. Our new babysitter chef was even more so. He exuded an air of confidence and importance that had us more nervous than usual. Add to this the fact that cuisine chefs have little time for pastry chefs, (too much weighing and measuring) let alone pastry students in their first course.
It was early in the course, and we had seen pastry cream prepared, and made it ...once. The chef suggested that we divide the main recipe and each make a component as if we were working together in a restaurant. One or two people would make a sponge cake, another the mousse, and another the crème pâtissière. This sounded very reasonable. We divided the duties between our small group, increasing the amounts so each of us would have the perfect amount for our dessert.
We carefully completed our mise en place (gathered our ingredients) and went to work. Our Chef walked about the room watching us, and helping with any questions and offering help with locations of ingredients. We had the feeling there were about a million other places he'd rather be, and he had more or less drawn the short straw to teach late that night. Every time he passed by my work station, I got a whiff of his amazing cologne and a stern glance that made me even more nervous. My French was caveman at best, so as he'd pass by, I'd muster a "bonjour Chef" and offer a nice Wisconsin smile. He smiled back, but looked like he had just tasted something sour.
My contribution to our group was the pastry cream. We needed 4 times the recipe for 4 students so I had to separate 16 eggs. It went fine. No broken yolks, and no spills. I gathered the milk, sugar, flour, cornstarch and eggs had headed over to the stove. I combined the ingredients in the order and technique from what my notes and memory offered. So I thought. I stood at the cooktop stirring and stirring, smiling away at the Chef as he approached. He stood beside me, and watched me stir. I had nothing to contribute to a conversation so I kept stirring and nervously smiling. Finally, he broke the silence with "Qu'est que sais?" I 'm sure I looked at him with a blank, panicked stare. "Qu'est-ce que tu fais?" (what are you making?), he asked. I thought to myself, what is wrong with him? Surely he's seen someone make pastry cream before. "Crème pâtissière, Chef", I said. Hoping that he'd move on. But no.
Then came the moment. The belly flop in front of your swimming class moment. In one motion, he flicked his head to the up and to the side, made THE tisk sound, and picked up my saucepan. "Suivez-moi", he said. I looked behind me where my classmates stood paralyzed watching and hoping one could translate. "He wants you to follow him", one piped up. So off we went from one end of the kitchen to the other. It felt like the distance of a football field, but it was really about 50 feet. I was about three steps behind, wondering where could we be going? We arrived at our destination, a gleaming stand holding a perfectly attached garbage bag. Why couldn't we just use the garbage can at our end of the room? He stepped on the foot pedal with his gorgeous French, perhaps Italian shoes and up went the lid. He stretched out his arms, and lifted the pan over his head and slowly dumped the gooey, wall paper paste mess from the pan into the garbage. My pastry cream was poubelle. Garbage.
"Répéter", he said as he put the pan in a nearby sink. I made the walk of shame back to my workstation. My friends were pale, very sympathetic and trying not to make eye contact. They had busied themselves with things to do that required crouching behind the workstation on the other side. I willed myself not cry. After all, he didn't yell and scream. But now what? I had no idea what I had done to cause the problem.
"Je vais vous aider à faire de la crème pâtissière", he said. I will help you make pastry cream. I gathered a new set on ingredients. He stood beside the entire time. Part of me wanted to crawl in a hole, and the part felt like I had a pro at my side who wasn't going to let me screw this up again.
We went to the stove together. I don't know what I did wrong the first time and never will. The second time required very little time at the stove. "Aller vite", go fast he said motioning with his arms so I knew just how fast to go. Our pastry cream was perfect. He held the plastic wrap lined pan as I plopped the rich, dreamy vanilla custard in to the pan. "Vous avez fait un bon travail ce moment", You did a good job that time. No hugs and back slaps, but a slight warmth in his eyes to let me know it was okay.
To this day, I think of him every time I make pastry cream. It's not good, it's great, and I have him to thank. Merci beaucoup, Chef.
I can't stand beside you, but I'll walk you through the steps of making crème pâtissière. Perfect pastry cream.
The ingredients are simple. Milk, sugar, flour, cornstarch and vanilla. I don't add other flavorings or steep fancy ingredients into the milk. I like to keep it pure and simple. If you don't have a vanilla bean, you can add vanilla extract at the end.

pastry cream ingredients

vanilla bean
Hold the vanilla bean with one hand, and with the other slice the bean open. Using the back side of the paring knife, gently slide down the length of the bean gathering the tiny vanilla seeds/paste. Put all the seeds and the pod into a saucepan with the milk and 1/2 of the sugar. Stir briefly, then bring to milk to a simmer over medium heat.
Now, in a bowl, whisk the egg yolks. Now while whisking the yolks, add the sugar. Keep whisking. There's a chemical reaction of heat that occurs when yolks meet sugar. This cooks the yolks, and can make microscopic scrambled eggs in the cream making the texture less than perfect. Once you have the eggs and sugar mixed, add the flour and cornstarch and mix well. The mixture will be thick.
eggs and sugar

vanilla and sugar in the milk
Now comes the fancy part. Once the milk is at a gentle boil/simmer. Pour about 1/3-1/2 of the milk in the bowl with the eggs. This is called tempering and lets the eggs know that they're about to get cooked. It keeps them from scrambling later and making lumpy cream. Mix the milk and eggs with a whisk until the mixture is smooth.
Now, bring the milk in the pan back to a rolling gentle simmer. Have your pan ready near by, lined with plastic wrap. Start whisking the milk and pour the eggs mixture into the milk whisking quickly. Pay careful attention to the corners of the pan. Stir quickly until you see the cream "burp" a bubble from the middle. This lets you know that the cream is heated through and can go into the pan. Don't overmix. The cream should be thick and glossy. This whole process will take seconds, not minutes.

cream in the pan just finished!
Now pour/spread the cream into the pan, and tuck the extra wrap around and over the cream to prevent and skin from forming on the cream as it cools. Look at this tiny little flecks of vanilla in the pastry cream!

ready to refrigerator
Be sure the cream is less than 2 inches thick and is cooling in a layer rather than in a bowl. It's much safer from a food safely standpoint. Allow the cream to chill about 2 hours or until cool in the center.
When the cream is cool. Transfer to a bowl and whisk to loosen and smooth the cream. Add about 1 T of Grand Marnier or a favorite liqueur adding a beautiful aroma and hint of flavor. You don't need to add the liqueur if you don't want to. This is point where you would add vanilla extract if you didn't use a vanilla bean.
Use the pastry cream to fill eclairs, layer between sheets of puff pastry, or use it to fill a pretty cake.
I hope you'll give this a try. It's delicious and a classic building block of all French pastry.
To print this recipe, click HERE
Pastry Creme (Crème Pâtissière)
500 ml milk
4 yolks from large eggs
125 gm sugar
30 gm cornstarch
30 gm flour
1 vanilla bean
1 T Grand Marnier or to taste (optional)
Directions
1. Line a shallow baking pan with plastic wrap.
2. Using a paring knife, slice the vanilla bean lengthwise through one side as if slicing a tube. Using the back side of the knife, slide it down the length of the exposed bean to scrape out the seeds. Remove seeds from vanilla bean.
3. In a saucepan, add the milk, vanilla seeds, the bean pod and 1/2 of the sugar.
4. Heat to a simmer.
5. While the milk is heating, whisk the egg yolks with the remaining sugar in a large heat proof bowl. Then add the cornstarch and flour. Mixing completely.
6. Remove the vanilla bean pod from the milk. Pour 1/2 or less of the warm milk into the bowl over the egg mixture and whisk until smooth. Increase the heat under the milk to a very slow boil.
6. Pour the egg mixture back into the pan, whisking quickly and constantly until the mixture forms a smooth, glossy cream and the cream "burps" a bubble in the pan.
7. Pour cream into the lined pan, folding the wrap and pressing on to the hot cream. Be careful, it's hot!
8. Chill until completely cool.
9. Remove plastic wrap and put the cream in a bowl. Whisk until smooth, then add Grand Marnier or other liqueur. This is the time to add vanilla extract if you did not use a vanilla bean.
10. Your pastry cream is ready for your favorite pastry! It will keep for about 2 days and must be refrigerated.

raspberries in puff