Nectarine Upside Down Chiffon Cake

this is my invariable advice to people:  Learn how to cook, try new recipes, learn from your mistakes, be fearless, and have fun.   Julia Child.  From My Life in France.

This has been my mantra for the past week getting ready for this recipe..   Learn from your mistakes, try something new, have fun, try new recipes, have fun... be fearless.  Got it!

As one of this week's Tuesday's with Dorie recipe hosts, my job is to provide the Nectarine Upside Down Chiffon Cake recipe, and give you the best tips and tricks I can.  Marlise, from The Double Trouble Kitchen, is your other host. I've been wanting to be a host for a long time.   I'm so happy to provide you with the recipe and be one of the "blogs of the month"!  It takes me back to being the child in school who got to pass out the graham crackers, or put up the calendar numbers on the bulletin board.    When I saw the title, my first reaction was, chiffon?  Oh boy...     I really wanted, and hoped it would be fine on the first try.  After all, I'm supposed to know what I'm doing and be able to teach others.   Time for some fun and fearlessness.

peaches-in-basket-1
peaches-in-basket-1

This is a grand, big girl/boy recipe.  It's a  boeuf bourguignon of desserts.  Multiple steps, a few tricky details, and magnificent results.   I know you can do it.  Follow the recipe and the tips, and you'll have a great, fancy dessert to share.

The first step was to find a 10" spring form pan.   I rummaged through my collection of pans, got out the ruler to measure, and ta-da... check.   Don't be tempted to use a smaller pan.  The recipe just fits into the 10" model.   If you must, just don't put all the batter into the pan.   It will be almost to the top.

This recipe used the last of my vacation peaches.  What a perfect recipe for such wonderful fruit.   The recipe calls for nectarines, so what's the difference?  Peach fuzz.   I popped the peaches in boiling water, counted to 20, rinsed under cool water, and slipped off the peels.   They were juicy, and perfect for the recipe.

You'll start the recipe by melting some of the butter in the bottom of the pan, adding brown sugar, and arranging the sliced fruit on top of the sugar.  Not so bad at all.   Be sure to wrap your pan in foil so the butter doesn't drip on to the floor of your oven when the cake goes in.  Even with the best foil work, you may still have drippage.

Butter Sugar Fruit Layer

Now on to the streusel.  I used chopped pecans instead of almonds, and didn't toast them before adding them to the other ingredients.   Add the ingredients to the food processor and pulse until you have nice clumps of streusel.  The baking time of 12 minutes was perfect.  The kitchen smelled great!   Warm, buttery and delicious.

streusel-toppping-3
streusel-toppping-3

The third step is the chiffon batter.   You'll be making a classic French meringue.  Be sure your egg whites are in an extra clean bowl, free of any yolk specs.  You may want to place the bowl over another bowl of warm water to gently warm the egg whites.  They'll whip faster and fuller than if they're cold.

What makes this French meringue?   Since the cake will be baked, the egg whites are not  heated as they are in Swiss Meringue.  The sugar in French meringue is not cooked (that's Italian meringue!).   This meringue is medium peak egg whites whipped together at the end with sugar until shiny and firm.   This is the easiest of meringues, but still requires special attention.   Once your meringue is shiny, and firm, you'll fold it into the yolk mixture.

To fold:  Hold your spatula perpendicular to the surface.  Cut straight in and down, then follow the edge of the bowl, up and over the top allowing the whites and yolk mixture to gently fall from the spatula.  Gentle!  Rotate the bowl, about 1/4 turn and repeat.  It will take several folds.  The batter should be light and homogeneous.

Place 1/2 of the over the fruit, add all but a few tablespoons of streusel, then add and smooth the remaining batter over the streusel.   The chiffon cake recipe states that it should be for 45-50 minutes.   I checked mine at 45, 55...65...75...85...90... minutes.   At this point, I was worried sick, and making plans for a redo, and writing the story in my mind about how I had tried and failed at this classic dessert.  Remember... be fearless and have fun!   Just past  1  1/2 hours of baking, the cake was firm to the touch and the toothpick came out clean.  The surface was golden brown, but I had no idea of what the fruit and sugar were going to look like at the bottom.   In another 25 minutes, I'd find out.

Puffed and fully baked

Twenty five minutes later, I attempted to release the springform ring.  The edges were stuck and I was about to rip the cake.  Whoops!   I used a butter knife to gently release the cake from the side of the pan.  It released perfectly, and was ready for the flip.

chifon-3-1
chifon-3-1

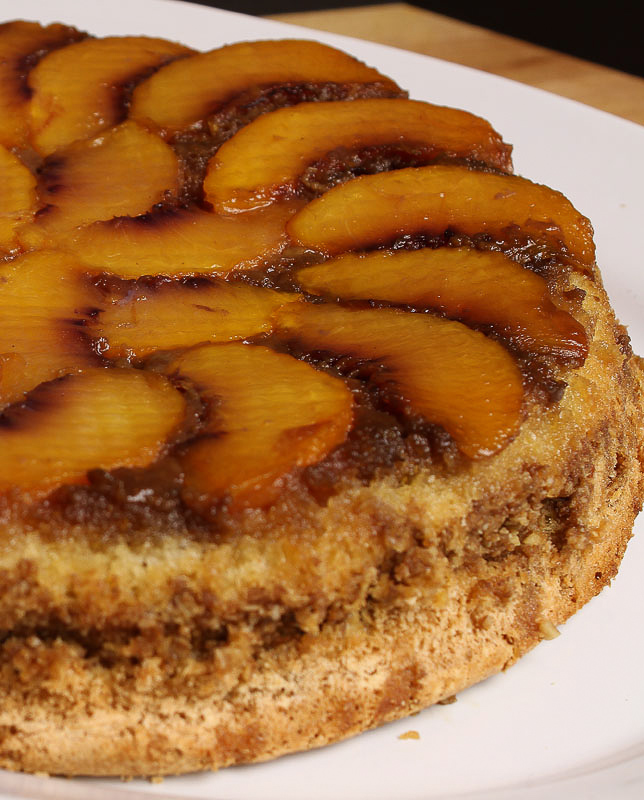
You can see the little dimples from the bottom of the spring form pan.  A sprinkle of streusel and the beautiful chiffon cake was finished.

To print this recipe, click HERE

Nectarine Upside-Down Chiffon Cake

For the Topping:

1/2 stick (2 oz) unsalted butter

1 cup, packed brown sugar

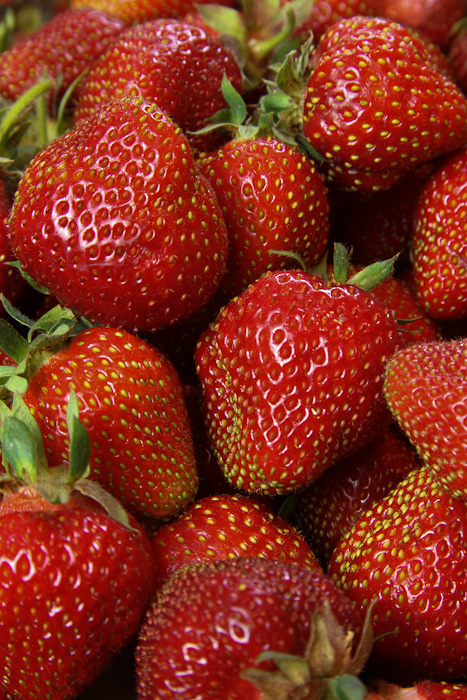
3-4 ripe medium nectarines (the number will depend on size), each cut into 8 pieces

Center a rack in the oven and preheat the oven to 325 degrees F.

Cut the butter into 3 or 4 chunks and toss them into a 10 inch springform pan that's 3 inches high.  Place the pan directly over medium-low  heat and melt the butter, tilting the pan so that the butter covers the bottom evenly.  Remove the pan from the heat and scatter the brown sugar evenly over the butter, patting it down with your fingertips.  Arrange the nectarine pieces in concentric circles over the sugar.  For a fancier effect, alternate the way the nectarines face from circle to circle.  Wrap the bottom of the pan in aluminum foil to catch any butter that might drip during baking and set the pan aside.

For the Streusel:

1/4 cup unblanched whole almonds

1/3 cup all-purpose flour

1/4 cup packed dark brown sugar

1 tsp cinnamon

1 tsp ginger

1/2 stick cold unsalted butter, cut into small pieces

1/2 cup quick cooking oats, (not instant)

Put the almonds on an ungreased jelly roll pan and bake them until golden brown and fragrant.  About 10-15 minutes.  Stir frequently so that they toast evenly.  To test for toastiness, break on open, it should be light brown in the center.  Cool the almonds before proceeding.

Line the jelly-roll pan with parchment paper and keep at the ready.

Put all the struesel ingredients, including the almonds, into the work bowl of the food processor fitted with the metal blade and pulse just to mix the ingredients and chop the almonds and butter.  The mixture will be rough and crumbly.  Spread the streusel out on hte pan and if you'd like to have a few largish lumps for textural interest, squeeze some the streusel lightly between your hands and then break the big clumps into smaller bits.

Bake the streusel for 10-15 minutes, stirring once or twice, until golden brown.  Transfer the pan to a rack an cool while you make the cake.  Keep the oven at 350 degrees F.

For the Cake:

1  1/2 cups sugar

1 cup all-purpose flour

1 tsp baking powder

1 tsp baking soda

1/4 tsp salt

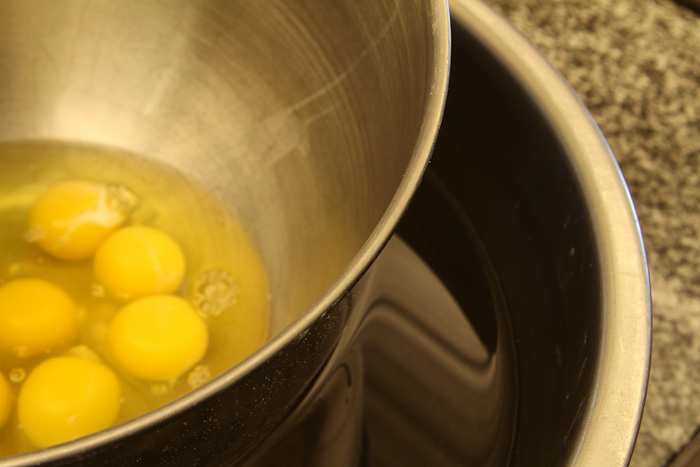
4 large eggs, separated

1/2 vegetable or safflower oil

1/2 cup fresh lemon juice

2 large egg whites

Ice cream or whipped cream, for serving (optional)

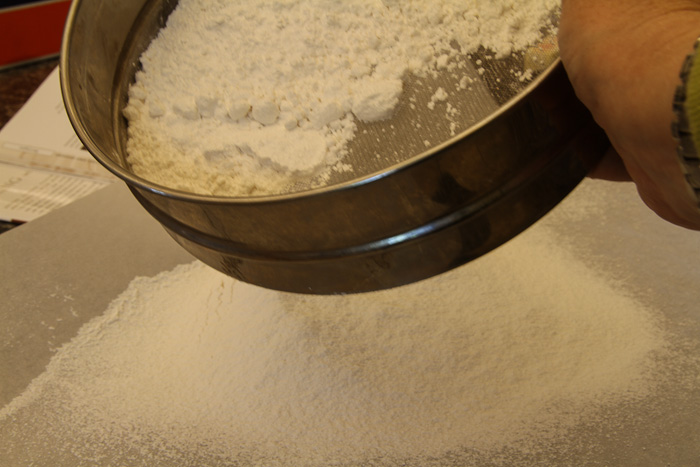
Sift together 1 sup of the sugar, the flour, baking powder, and baking soda onto a sheet of parchment or waxed paper; add the salt.

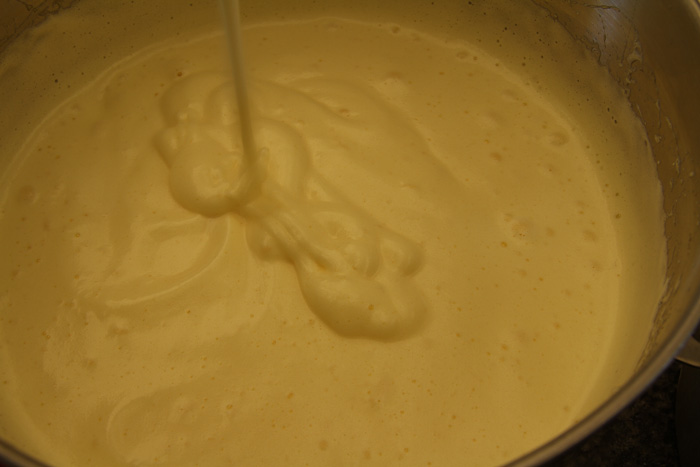
In a large bowl, whisk together the yolks, oil, and lemon juice until blended.  Gradually add the dry ingredients to the yolk mixture, whisking all the while; set aside.

Beat the 6 whites in the bowl of a mixer fitted with the whisk attachment, or work with a hand-held mixer.  At low speed, beat the whites until thy're foamy and form very soft peaks.  Increase the mixer speed to medium -high and gradually add the remaining 1/2 cup sugar, beating until the whites are thick and shiny and hold peaks.  (If you run a finger through the whites, it should a leave a smooth, even path.)  Fold about one third of the whipped egg whites into the yolk mixture to lighten  it, then turn the yolk mixture into the whites and fold it in gently but thoroughly.

Baking the Cake:  Pour and scrape half of the batter into the fruit-lined pan.  Smooth the top, using an offset spatula, and sprinkle ever the streusel, keeping a little in reserve for decoration the finished cakes.  Top with the remainder of the better, smoothing it with the spatula, an place the pan on a jelly-roll pan.  Bake in the 350 degree oven for 45-50 minutes, or until golden and a toothpick inserted in the center comes out clean.  Remove the cake to a cooking rack and let it cool for at least 25 minutes before inverting onto a cardboard cake round or a serving platter.

Serve the cake with ice cream or lightly sweetened whipped cream if desired and a sprinkle of the remaining streusel.

Storing: The cake is best served just warm or at room temperature the day it is made.  However, you can cover the cake and keep i t at room temperature over-night.

Makes 8-10 servings.   Contributing baker, Mary Bergin


chifon-cake-1-2
chifon-cake-1-2

The cake is just as it's described in Baking with Julia.  It's  light, buttery and delicious.  The streusel and peaches were a perfect pair.  I hope you'll try this recipe.   Try a new recipe, be fearless and have fun!

chifon-cake-2-6
chifon-cake-2-6

Strawberry Cream Cake

  img_6644-11


What a treat!  Don't you LOVE strawberries?  I do.  Very much!

Last summer I went to the close-out sale of the Farm & Fleet garden center.  They set it up each spring, and close it sometime in June, or July.  I found four strawberry plants that needed a home.  They didn't have a variety or pedigree, they were marked "strawberry".   I brought them home and planted them in the little herb garden behind the wood oven next to the oregano and thyme.   I ddn't expect much from them, but hoped they would at least survive.  And survive they did.   One day on late May I was weeding, and found at least three that were nearly ready to pick.   They were very early... with a few others nearly ready as well.

My parents were visiting (inportant note:  My dad has a degree in horticulture and agronomy...) and I proudly picked two ripe berries.  We shared them, and ooh'ed and ahh'ed about how delicious they were.   I named them One and Two.   A few days later,  I picked Two and Three, followed by Four, Five, Six and Seven.    I won't bore you with the details, but suffice to say that I grew 14 strawberries!

The berries in the photo came from a berry farmer about 1 mile from our house.  We picked them on the second day of the season.   The berries have had a tough year.  Early, dry, hot, and just plain mixed up.  I'm hoping that my berries will be back next year, I'd love to be able to make a whole cake with them!  The berry on the top of the strawberry cake is one of mine.

The best part of the dessert this week is that I was able to take it to dinner with good friends celebrating their 40th Anniversary! 

The recipe this week is hosted by Sophia of Sophia's Sweets and Allsion of Think, Love, Sleep, Dine.  They'll both the recipe for you.

I've said it again and again.  Simple recipes with few ingredients are some of the most difficult.  Genoise is in that group.   It's not hard, though it takes a great deal of respect for the ingredients.

Eggs are the leavening agent in this tender cake.  They need to be at room temperature to maximize the loft from whisking.   Rather than leave them at room temperture to warm, here's a tip.   Place them in the stainless steel bowl, then place that bowl over warm water.   I like to swish them around a little bit.   Once the chill is off, you're ready to go.

img_6654-3

After several minutes of whisking, the eggs and sugar reach the "ribbon" state.   A gentle ribbon of the mixture will set on the surface when drizzled from the whisk.

img_6655-4

Then, the sifted flour is carefully folded into the egg/sugar mixture.  The last step, folding the melted butter into the mix.

img_6652-1

The genoise smells SO good as it bakes.  Once it's cool, top the layers  with the macerated (berries mixed with sugar), and fluffy whipped cream mixture.

img_6660-11


img_6670-5

 I decided not to frost the whole with cream, but just dollop it on the top.

img_6673-7


 img_6664-3


Pizza Rustica - Baking with Julia

What a difference a week makes!  Last week, I was planning to make this recipe and serve it for dinner with salad.  Well, things have changed.  Our household has turned into a heart-healthy, diabetic diet zone.  Can you believe it?  Gary's back from having a cardiac tune-up, and I'm joining him in solidarity.  Never fear,  I'm not closing my pastry business or considering dropping out of BWj.   We'll just need to find good homes for many of the delights.   As I've been perusing a whole new world of cookbooks and recipes, I've decided to blog about the adventure.   So, my 2nd blog is Cooking for our Health.   I'll review tips, tricks and recipes for low fat, low carbohydrate meals.   Please check it out, and join in with your ideas. When I read through the Pizza Rustica recipe, I thought it sounded a little cheese heavy, and maybe not so good.  Yes, even a Wisconsin girl can have too much cheese.  I was also wondered about the absence of sliced or some sort of tomato sauce.  My worries were unnecessary. The pizza tart/pie was delicious and really pretty.   The crust was easy to manage and the filling easy to put together.

I made a call to our neighbor with three children.  It seemed like a sure thing that the pizza would be a hit.  The results came in, and the boys loved it!  They added salsa for extra zip, which sounds pretty good.

One of my favorite parts of this recipe was cutting the strips for the lattice.  I have this little tool from Paris that I've had for about 12 years, and never remember to use it.  It's a pastry cutter.   I believe it made by hand by the same man who makes the rolling pins for E. Dehillerin, the famous cooking equipment shop.  I've included a photo later in my post.

 The dough rolled out to just the right size.  Here's the dough and the boxwood rolling-pin I mentioned.

The lattice wasn't browning as much as I liked, so I tented foil around the browned edges and let it bake a little longer.  It never browned as much as I would have liked, but all the components seemed to be fully baked.

Well, Wordpress  and I are having trouble working together.  My last photos don't want to upload a just into the post.  I'll keep trying, and hopefully you'll get to see the finished Pizza Rustica!

The next recipe is Lemon Loaf -  Very Springy!

Irish Soda Bread - Baking with Julia

Happy Belated St. Patrick's Day!  I'm not Irish, and don't really have any Irish traditions so this was a nice way to start one. The recipe has only four ingredients.   With so few, they have to be good, and they have to be treated and executed well.  Don't overmix, bake enough, don't over bake.  And most of all, don't dilly-dally around once the buttermilk is combined with the dry ingredients.   Baking Soda, the star of Soda bread, needs two actions to start the CO2 flowing.   Liquid and Acid.   The buttermilk provides both.  Once it's added, the magic begins.   The key is to mix quickly and completely and get the bread into the oven so it can start baking and rising even more.   My dough took off right away.  You can see it start to spring just after I made the slashes on the top.

The bread baked evenly and had a nice hollow thump when tapped.   We tryed to wait overnight to have it for breakfast, but we couldn't wait.   After about 15 minutes of cooling, I cut off two slices for tastes.   It was really tasty.    I added golden raisins, which added a gentle taste and texture.    If you'd like to try the recipe, Carla and Cathleen , are the Tuesday's with Dorie/Baking with Julia hosts and will have the recipe on their blogs.

Here's the finished Irish Soda Bread, a new tradition!

Baking with Julia: Rugelach... Divine!


This week's Baking with Julia recipe is Rugelach.  A lovely pastry cookie filled with apricot lekvar, dried fruits and nuts.   I've made Julia's lekvar several times for wedding cake filling.   It's so good!   And simple.   Cooked dried apricots with brown sugar, and almonds.  All pureed into the spreadable paste.   The lekvar is spread on the cream cheese pastry dough, topped with nuts and more dried fruit, then rolled and baked.    Simple, not too sweet and so pretty. The dough is made in the mixer.  Emergency subject change and news flash.  My first Kitchen Aid mixer is broken.  I was making many, many croissants, and used the paddle to work together the detrempe.   On the last batch... snap.    All motor, no action.  I have another mixer, but that  was the first one I bought for the bakery and she'll be off to the repair shop for a quick repair.  It's funny, that little mixer always seemed a little more fragile than the others.   Today, I'm working in the house with the mixer that gets the least amount of use.   We should be in good hands.

Back to the dough.  The dough is made with cream cheese.  It works together beautifully and is very soft and easy to work with.   Since the dough is going to be rolled into a rectangle, it's always a good idea to shape the dough into that shape before chilling.   So pretty!

I really like apricots and prunes.  For this recipe's lekvar, I used about 2 cups of apricots and a few prunes for color and taste.  The almonds were toasted, slivered and worked really well.  I really like the color of the finished product.  It tastes and smells SO good!

The recipe for the Rugelach requires lots of prep in little bowls.   Nothing too fussy, but you need to make sure you'll all set before you start to fill the dough.  This is kind of an ugly photo, but wanted to show all the components set to go.

The rolls chilled for four hours, and then were egg washed, cut and rolled and a delightful nut, sugar, cinnamon combo.   I wasn't planning to stay up late and wait to bake them, but I'm in for the long haul with this recipe.   There must be something good on TV!

We really liked the recipe.  I'm not positive that they were completely done, but they were nicely caramelized and had been in the oven for 30 minutes.   The dough was still tender and soft, I was expecting a little crunchier.   The fruit and nuts were really good.

Just click the link to read more entries for Rugelach on the Baking with Julia  website.  In two weeks we'll be making Irish Soda Bread!  Another great recipe.  if you're looking the the recipes, the host each week will add the recipe to their post.  It should be one of the first posts of the group.  Anyone can join the fun.  Pick up a copy of the book and start to blog!

Baking with Julia Week 1: White Bread

It's finally February 7th!  I've been waiting patiently (well, not so patiently) for today.   Today is the very first week of Baking with Julia, a baking group coordinated by Dorie Greenspan.  The original group baked its way though Dorie's Baking book.  They completely the recipes and were ready for the next challenge.  Dorie Greenspan authored Baking with Julia, so its fitting her book is next. Twice each month, we'll bake two recipes from the book and post to http://tuesdayswithdorie.wordpress.com/     As some of you may know, I also participate in French Fridays with Dorie, which bakes & cooks recipes from Around My French Table.

I never had the opportunity to meet Julia Child, but I love her.  I love her fearless spirit, her laugh, her stature, and most of all her love of cooking.   When I pull out her books and read a recipe, its her voice I hear reading to me.   If something spills or doesn't turn out quite right, she's there in spirit with her happy, let's move on, coaching.  I know things will turn out fine.   My hope is that I can inspire people the way she does some day.

I hope you'll pick up a copy of the book and bake along with me.   Feel free to add your link or notes in my comments area.  Or, sign up with the group.   The February 21st recipe is Chocolate Truffle Tartlets!  Can't wait!

Let's start baking!

Of all the categories in the patisserie world, I think I like bread making the best.   It takes times, patience, and the coordination of efforts with dough.    Yeast is in charge of most of the process.  You can try to rush it, but its really going to do what it pleases.   It's more like a duet.

The recipe makes two loaves of bread.  I doubled the recipe (exactly) for make four loaves.   I also used my French bread kneading machine just to pull the dough together.   I finished the dough my hand.  The machine is to cool.  It turns against the doughs friction against the side as the hook pulls and turns the dough.  Just the action that you do with your hands.  It allows me to make bigger batches, and have my hands free for other baking.   It's very gentle, and still requires fairly close supervision so the dough doesn't wander up the hook or out of the bowl.  We used a machine like this at school, and I was able to find one when I got home.  I can make up to about 10 loaves of bread in it at a time.  Not huge production, but bigger quantities than can easily be done by hand.

Once the dough was mixed, it rested for about 5 minutes.  This process is called autolyse.  The yeast gets started, the flour and water setttle in, and the gluten begins to develop.

When I'm teaching a bread class, the number one question is always. "How long will I knead the dough?"  The best way to know that you're finished kneading it to check a gluten window.   Gently cut off a small piece of dough, gently tease/strectch the dough with your fingers and look for a sheer pane of dough that wont' tear as it's being stretched.   It you can make it sheer without tearing, you're finished!   Here' a photo of the White Breads' gluten window.

Notice the light coming through the sheer dough.  I was doing the photography and stretching myself, so the dough isn't stretched as thin or far as I would have like.    Every single time I make bread, I check for the window.  Every batch is different, and I always want to make sure I've worked the dough enough.

After the dough has had a good rise, and at least doubled in volume, it's time to shape the loaves.  I weighed the whole batch, then divided by four to make sure each loaf was about the same size.  You certainly don't have to be this picky, but baking is much more even when the loaves are the same.   I like to cover the bread pans with a favorite towel.  Call me superstitous.   By the way, did I tell you that I always spin the dough three times, then flip it in the bowl before it starts to rise?   Habits are good!

Here are the sweet loaves shaped and ready for the 2nd rise.

The 2nd rise is about an hour.  The key to to let the bread rise until the loaf is about 1 inch about the top of the pan.  That way, with the added spring in the oven, you'll have a nice tall loaf  with perfectconsistency to the crumb.  This recipe has a little bit more yeast than some recipes, so the bread rose faster than I was expecting.  It's just a bit taller than usual, but doesn't it look great!??

Now into the oven!  The yeast will work like crazy as the temperature of the dough increases.  Once the dough reached about 120 F, the yeast will die, and bread will be it's finished size.    I bake the dough until the internal temperature is about 180-200F.   Just push an instant read thermometer right into the end.  You can also pop the dough of the pan and look at the color.   It should be golden.  Once you've got the temp and color, try to tap the loaf and listen to the "hollow" thump.   It's hard to know that sound unless you know the bread is done.    I turn the bread out of the pans immediately and let them cool on their sides.  OK, another weird habit, but it works.   I pulled this bread out of the oven at about 195F and liked the pretty light golden color.  This was JUST enough.   It could have easily gone another 5 minutes.  It's great for toast.  Don't underbake your bread.  The golden color is caramelization of the sugars which equals flavor!

The bread is cool, and upon inspection, no swirly holes.   It has a nice soft but sturdy, consistent crumb.   And... look at the cute shape of the loaves.  They look like the cookie cutter shape of bread!  and...not too high to fit into the toaster!

I hope you'll join me in two weeks for the Chocolate Truffle Tartlets.  In the words of our dear Julia,  "Bon Appetit"!