
Love Chips + Dip? Here's a dip that will amaze your friends.
Read morePastry Creme (Crème Pâtissière)


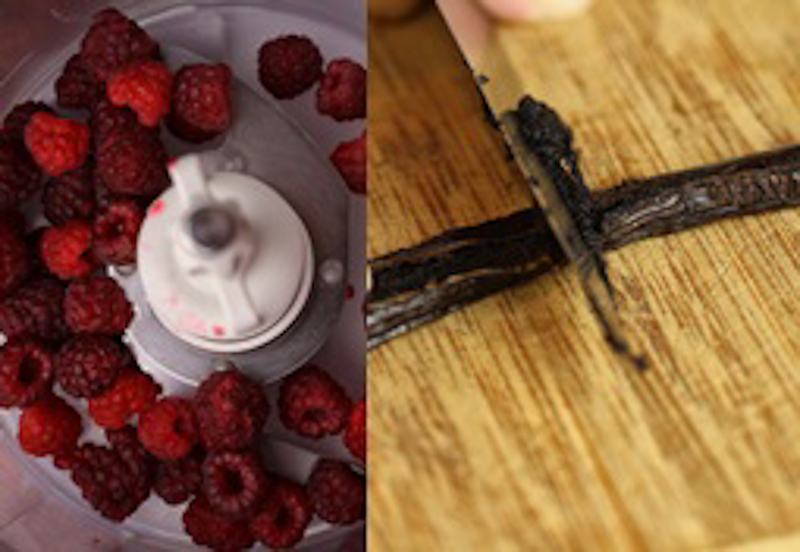
Pastry Cream in Puff Pastry
As I prepare to leave for Paris it seems like the perfect time to tell this story. It's always fun remembering my days at Le Cordon Bleu. I hope you'll enjoy.
The March to the Poubelle
Our Basic Pastry Course was in the intensive format meaning that we took 3-4 classes each day instead of 1. It condensed 12-14 weeks of curriculum to just three. It truly was intense. We would be in the lecture room then immediately run downstairs to the kitchen to prepare at least one or all of the recipes the chef had just demonstrated, then back to the classroom. The days started at 8:00 am, and went until 8:00 pm. Some days included a free time block to run an errand, or in our case to do a little shopping and or eating. Both activities were highly encouraged. After all, how were we to learn what great pastries looked and tasted like?
The chefs in the school worked a French workweek (35 hours), so we had to have a combination of chefs to cover our long days. Our main chef instructor was off for the evening and bid us farewell. Another chef, who happened to be a Cuisine program chef, was going to oversee our kitchen preparations. All the chefs were very distinguished and impeccably neat. Our new babysitter chef was even more so. He exuded an air of confidence and importance that had us more nervous than usual. Add to this the fact that cuisine chefs have little time for pastry chefs, (too much weighing and measuring) let alone pastry students in their first course.
It was early in the course, and we had seen pastry cream prepared, and made it ...once. The chef suggested that we divide the main recipe and each make a component as if we were working together in a restaurant. One or two people would make a sponge cake, another the mousse, and another the crème pâtissière. This sounded very reasonable. We divided the duties between our small group, increasing the amounts so each of us would have the perfect amount for our dessert.
We carefully completed our mise en place (gathered our ingredients) and went to work. Our Chef walked about the room watching us, and helping with any questions and offering help with locations of ingredients. We had the feeling there were about a million other places he'd rather be, and he had more or less drawn the short straw to teach late that night. Every time he passed by my work station, I got a whiff of his amazing cologne and a stern glance that made me even more nervous. My French was caveman at best, so as he'd pass by, I'd muster a "bonjour Chef" and offer a nice Wisconsin smile. He smiled back, but looked like he had just tasted something sour.
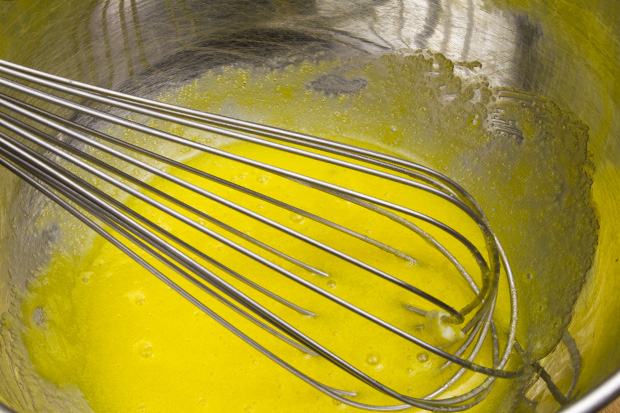
My contribution to our group was the pastry cream. We needed 4 times the recipe for 4 students so I had to separate 16 eggs. It went fine. No broken yolks, and no spills. I gathered the milk, sugar, flour, cornstarch and eggs had headed over to the stove. I combined the ingredients in the order and technique from what my notes and memory offered. So I thought. I stood at the cooktop stirring and stirring, smiling away at the Chef as he approached. He stood beside me, and watched me stir. I had nothing to contribute to a conversation so I kept stirring and nervously smiling. Finally, he broke the silence with "Qu'est que sais?" I 'm sure I looked at him with a blank, panicked stare. "Qu'est-ce que tu fais?" (what are you making?), he asked. I thought to myself, what is wrong with him? Surely he's seen someone make pastry cream before. "Crème pâtissière, Chef", I said. Hoping that he'd move on. But no.
Then came the moment. The belly flop in front of your swimming class moment. In one motion, he flicked his head to the up and to the side, made THE tisk sound, and picked up my saucepan. "Suivez-moi", he said. I looked behind me where my classmates stood paralyzed watching and hoping one could translate. "He wants you to follow him", one piped up. So off we went from one end of the kitchen to the other. It felt like the distance of a football field, but it was really about 50 feet. I was about three steps behind, wondering where could we be going? We arrived at our destination, a gleaming stand holding a perfectly attached garbage bag. Why couldn't we just use the garbage can at our end of the room? He stepped on the foot pedal with his gorgeous French, perhaps Italian shoes and up went the lid. He stretched out his arms, and lifted the pan over his head and slowly dumped the gooey, wall paper paste mess from the pan into the garbage. My pastry cream was poubelle. Garbage.
"Répéter", he said as he put the pan in a nearby sink. I made the walk of shame back to my workstation. My friends were pale, very sympathetic and trying not to make eye contact. They had busied themselves with things to do that required crouching behind the workstation on the other side. I willed myself not cry. After all, he didn't yell and scream. But now what? I had no idea what I had done to cause the problem.
"Je vais vous aider à faire de la crème pâtissière", he said. I will help you make pastry cream. I gathered a new set on ingredients. He stood beside the entire time. Part of me wanted to crawl in a hole, and the part felt like I had a pro at my side who wasn't going to let me screw this up again.
We went to the stove together. I don't know what I did wrong the first time and never will. The second time required very little time at the stove. "Aller vite", go fast he said motioning with his arms so I knew just how fast to go. Our pastry cream was perfect. He held the plastic wrap lined pan as I plopped the rich, dreamy vanilla custard in to the pan. "Vous avez fait un bon travail ce moment", You did a good job that time. No hugs and back slaps, but a slight warmth in his eyes to let me know it was okay.
To this day, I think of him every time I make pastry cream. It's not good, it's great, and I have him to thank. Merci beaucoup, Chef.
I can't stand beside you, but I'll walk you through the steps of making crème pâtissière. Perfect pastry cream.
The ingredients are simple. Milk, sugar, flour, cornstarch and vanilla. I don't add other flavorings or steep fancy ingredients into the milk. I like to keep it pure and simple. If you don't have a vanilla bean, you can add vanilla extract at the end.

pastry cream ingredients

vanilla bean
Hold the vanilla bean with one hand, and with the other slice the bean open. Using the back side of the paring knife, gently slide down the length of the bean gathering the tiny vanilla seeds/paste. Put all the seeds and the pod into a saucepan with the milk and 1/2 of the sugar. Stir briefly, then bring to milk to a simmer over medium heat.
Now, in a bowl, whisk the egg yolks. Now while whisking the yolks, add the sugar. Keep whisking. There's a chemical reaction of heat that occurs when yolks meet sugar. This cooks the yolks, and can make microscopic scrambled eggs in the cream making the texture less than perfect. Once you have the eggs and sugar mixed, add the flour and cornstarch and mix well. The mixture will be thick.
eggs and sugar

vanilla and sugar in the milk
Now comes the fancy part. Once the milk is at a gentle boil/simmer. Pour about 1/3-1/2 of the milk in the bowl with the eggs. This is called tempering and lets the eggs know that they're about to get cooked. It keeps them from scrambling later and making lumpy cream. Mix the milk and eggs with a whisk until the mixture is smooth.
Now, bring the milk in the pan back to a rolling gentle simmer. Have your pan ready near by, lined with plastic wrap. Start whisking the milk and pour the eggs mixture into the milk whisking quickly. Pay careful attention to the corners of the pan. Stir quickly until you see the cream "burp" a bubble from the middle. This lets you know that the cream is heated through and can go into the pan. Don't overmix. The cream should be thick and glossy. This whole process will take seconds, not minutes.

cream in the pan just finished!
Now pour/spread the cream into the pan, and tuck the extra wrap around and over the cream to prevent and skin from forming on the cream as it cools. Look at this tiny little flecks of vanilla in the pastry cream!

ready to refrigerator
Be sure the cream is less than 2 inches thick and is cooling in a layer rather than in a bowl. It's much safer from a food safely standpoint. Allow the cream to chill about 2 hours or until cool in the center.
When the cream is cool. Transfer to a bowl and whisk to loosen and smooth the cream. Add about 1 T of Grand Marnier or a favorite liqueur adding a beautiful aroma and hint of flavor. You don't need to add the liqueur if you don't want to. This is point where you would add vanilla extract if you didn't use a vanilla bean.
Use the pastry cream to fill eclairs, layer between sheets of puff pastry, or use it to fill a pretty cake.
I hope you'll give this a try. It's delicious and a classic building block of all French pastry.
To print this recipe, click HERE
Pastry Creme (Crème Pâtissière)
500 ml milk
4 yolks from large eggs
125 gm sugar
30 gm cornstarch
30 gm flour
1 vanilla bean
1 T Grand Marnier or to taste (optional)
Directions
1. Line a shallow baking pan with plastic wrap.
2. Using a paring knife, slice the vanilla bean lengthwise through one side as if slicing a tube. Using the back side of the knife, slide it down the length of the exposed bean to scrape out the seeds. Remove seeds from vanilla bean.
3. In a saucepan, add the milk, vanilla seeds, the bean pod and 1/2 of the sugar.
4. Heat to a simmer.
5. While the milk is heating, whisk the egg yolks with the remaining sugar in a large heat proof bowl. Then add the cornstarch and flour. Mixing completely.
6. Remove the vanilla bean pod from the milk. Pour 1/2 or less of the warm milk into the bowl over the egg mixture and whisk until smooth. Increase the heat under the milk to a very slow boil.
6. Pour the egg mixture back into the pan, whisking quickly and constantly until the mixture forms a smooth, glossy cream and the cream "burps" a bubble in the pan.
7. Pour cream into the lined pan, folding the wrap and pressing on to the hot cream. Be careful, it's hot!
8. Chill until completely cool.
9. Remove plastic wrap and put the cream in a bowl. Whisk until smooth, then add Grand Marnier or other liqueur. This is the time to add vanilla extract if you did not use a vanilla bean.
10. Your pastry cream is ready for your favorite pastry! It will keep for about 2 days and must be refrigerated.

raspberries in puff
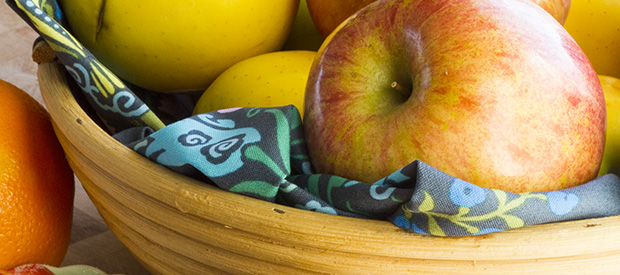
Long and Slow Baked Apples
What are your plans for the weekend? In that organizing mood? I'd love to know how many of those plastic tubs are sold during January. Today I saw a display of them in very fancy colors. Personally, I like the clear ones so I can see what's inside. I guess I could label them and then it wouldn't be necessary to open each one to find my summer clothes. My new goal is things I'm not using get it out the door rather than squirreled away in the basement. We'll see! I think it feels good to have some routine back again after the holidays. Back from the free fall of sweets and dips. Don't get me wrong, it's still winter and comfort food is still very welcome. Now it's time for slow roasting, nice smells and healthier options.
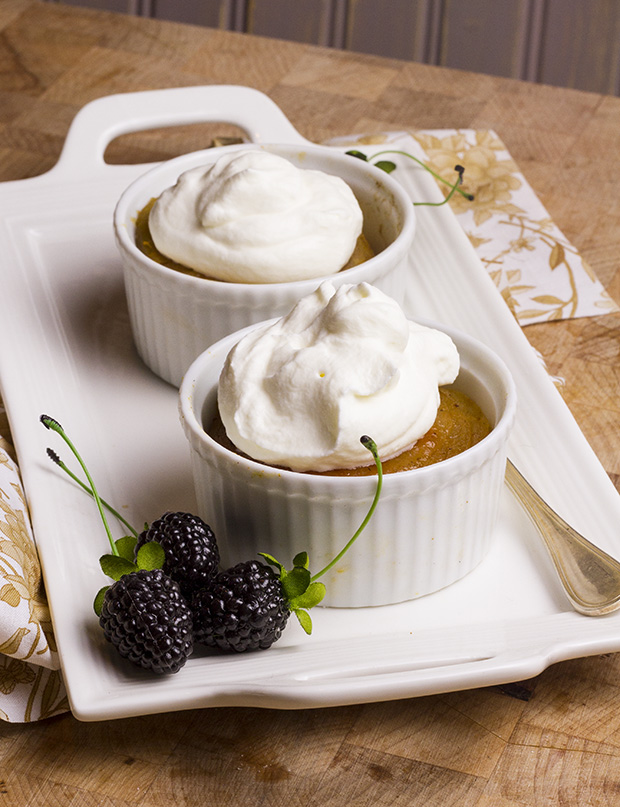
There's comfort food, and then there's great comfort food. What could possibly be better than creamy, sweet baked apples? This is an Around My French Table recipe, by Dorie Greenspan. As you know, I love simple, yet a little fussy recipes. I think you'll love this one. Why?
1. You get to use ramekins. You know you love them.
2. You get to use your mandolin. Promise, promise, promise you won't use it without the guard.
3. You'll practice your apple peeling.
4. You'll bake with plastic wrap. Something I did in Paris and thought I'd never do again. It works, really!
5. The result is a delicious apple dessert -so creamy and rich, it's almost like custard. It's well worth the fussy preparation.

Long and Slow Baked Apples
The recipe is actually pretty simple, just a little time consuming. Peel, core and slice apples. I used Fuji and they were a really nice texture and flavor. Be sure they're sliced very thin.
Then layer the slices with melted butter, and sugar that has been spiced with ginger and orange zest. I skipped the ginger and used nutmeg instead. The slices fit perfectly into the ramekins and towered over the top.

stacked apples
Then, wrap the ramekin in plastic wrap, then foil. Make a few puncture holes in the top and cover with another ramekin to provide just a little pressure to the apples while they bake.

plastic wrap on apples

ramekins on top
Now, find a good book - or a closet to clean. The apples will bake for two hours at 300 degrees F. After they're baked, let them cool all wrapped up for 15 minutes or so, then carefully unwrap them. It's amazing!

finished apples1
I went a little crazy and made three recipes from Around My French Table. The herbed spaetzle, the Orange Pork Tenderloin and the Long and Slow Baked Apples. It was a wonderful meal. The pork and fragrant fruits were a nice combination. The apples were a light yet very satisfying dessert ( with some sweetened whipped cream!)
When I make these again, I'm going to turn the apples out on to a plate and serve them with a dollop of creme fraiche. It's always a perfect match with apples. Do you know how to make creme fraiche? It's very easy, but requires a little planning.
To print, click HERE
Creme Fraiche
2 cups Heavy Cream
2 T Buttermilk
Mix together, and allow to set uncovered at room temperature overnight ( or about 8-12 hours). You can use it right away or stir, cover and chill. The mixture will continue to thicken and become more tangy. You can keep it up to about 2 weeks in the refrigerator. If you don't need so much, feel free to divide the recipe and only make a half batch.
Stayed tuned everyone! I'm heading to Paris and will try to send you photos and do a few blogs posts. Is there anything you'd like to see or read about while I'm there? What a nice coincidence that next week's Around My French Table recipe in a French Apple Tart. Tres Bien!
baked apples on tray
Onion Confit Pizza

Happy New Year everyone! Most of the decorations are put away, and I'm happy to be back blogging and cooking. As I write, there are carpenters working on the bakery building adding a "pantry". It's going to be great. Lots of room to put away the shelving units that have been taking up space for years. There will be more room for classes, and I'll be able to welcome larger groups. Since we didn't need two pizzas, and it's the middle of the day. I invited the guys for lunch. It's freezing cold and a nice hot pizza sounded good. It makes me feel a little like Ina Garten!
I decided to use Chianti for the wine. The kind with the straw around the bottle. When we were Christmas shopping, I found boxes of the drippy candles that change color as they drip. My dad loves these and so do I. I could use a regular wine bottle, but since I needed wine and the candles needed a bottle, this was the perfect match. I need to drink or use about another 750 ml's of wine before the candle dripping can commence but I'm off to a good start. If you look at the box, you'll see the wine bottle sketched out! I promise to show you the bottle once it's been dripped.

There are some fun recipes just around the corner. The recipe for today is from Baking with Julia, by Dorie Greenspan and is part of the Tuesdays with Dorie blogging group. It's not too late to pick up a copy and join the fun.
On to the pizza...

A few years ago, I was making the Onion Soup from Thomas Keller's Bouchon. In the recipe, he teaches how to cut an onion perfectly so it will wilt and cook down nicely for caramelized onions. I used the same technique here and will show you how it's done.


If you run out of room, turn the onion around and start from the other side. Cutting this way will break the membrane in the layers of the onion and help to make them move tender and softer as they caramelize.
So what is confit (cone-fee)? It's the process of cooking to make the fruit of vegetable soft but sweet. Orange peels are confited before being dipped into dark chocolate. Confiture is jam in French. So think... tender, sweet onions.
Once the onions (sprinkled with sugar) are in the pan and cooked a bit, the wine, red wine vinegar, thyme, salt and pepper as added. I simmered the confit for about 1 1/2 hours. Just the perfect time for the dough to have a second rise.
The dough is very easy to put together and has a wonderful texture and feel. If you're not planning to make the onion confit, you should still head over to The Boy Can Bake and Paul will have all the recipes for you.
I used a mix of Parmesan, Romano, and Asiago cheeses with an assortment of olives. A few of the olives were stuffed with blue cheese so they were a great addition.

Exactly 15 minutes later the pizza was crisp, golden and delicious. I baked mine on parchment on a baking sheet and skipped the peel process.

Have a great time making this pizza! (and dripping candles...)
Fig Cookies (aka Newtons)

figs
Happy Holidays everyone! It's only a few days for Christmas, and I'm thinking this may be my last post before the holiday. I'd like to start off by wishing you all the best of the season and many thanks for reading and supporting my blog.
We've shoveled out from Thursday's blizzard and are ready to brave the stores to select presents for friends and family. Nope, we're not late or under pressure. This is the way we do it. In fact, one of our first dates was shopping together one day after work on the 23rd of December. I'm sure our trip will include lunch of sushi!
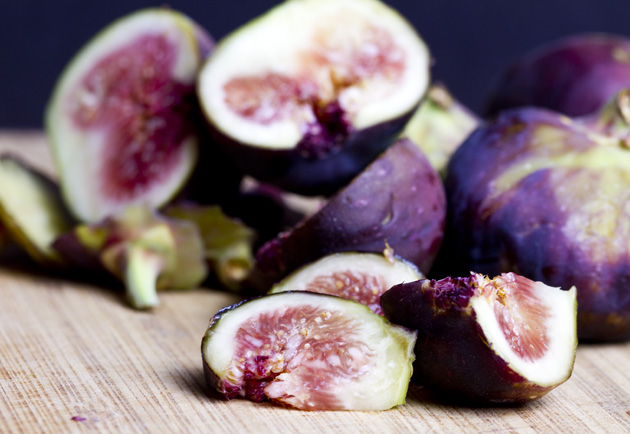
Figs are high on my list of favorite holiday foods. I think I stumbled upon them about ten years ago in a fancy-schmacy grocery and bought a few. Add some stilton, pears, port and a fire in the fireplace and it's perfect. Speaking of favortie things, I have one question. Why is Favorite Things considered a holiday song? Because of the warm woolen mittens? Geeesh. I love Julie Andrews, but I think it's a stretch. Back to the figs. I picked up three small boxes, brought them home, and then came across a recipe for Fig Cookies with red wine. I'm in!
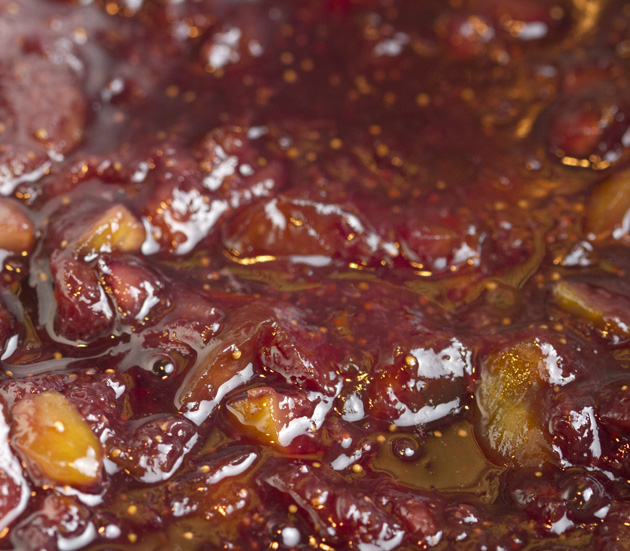
You can start out with your dough or figs paste first. They both need to cool/chill so it won't really matter which you start with. I started with the paste. Chop the figs and open a bottle of red wine. Hmmm, what to do with the rest of the bottle after the 1 1/2 cups are in the pan?

chopped figs
Once in the pan, I added a pinch of salt to bring out the sweetness. You could also add black pepper or some anise seeds depending on your like/dislikes in the spice area. Simmer the figs until they're soft and the syrup if reduced it about 1/2 cup. It's hard to tell how much liquid is left, but tip the pan and when the syrup is almost gone, call it. Let mixture cool in the pan while you prepare the dough.

cooked figs 1
cooked figs 2

cooked figs 3
Now on to the dough. You can use a stand mixer, or hand mixer. Cream the butter and sugar and mix until light and fluffy. Add the salt, vanilla, zest., mix. Add the egg. Mix to combine. Mix in the flour just until the dough comes together. Flatten the dough in a rectangle and chill for about 30 minutes.
While the dough is chilling, you can puree the fig paste in a food processor or blender.

fig spread
Notice how red the spread looks. I was a little worried at first, but it darkens when it cooks. This is a good time to preheat your oven.
Using floured parchment paper. Roll the dough about 12inches long and about 14 inches wide. If it's easier, you can do this in two parts, so the dough is 12 x 7 or so. It should be about 1/8" thick.

rolled dough
Now for the tricky part. Make 3 inch wide strips, and pipe the filling about 1/2 inch down the center. Resist the temptation to use too much filling. If the dough feels too sticky or warm, don't hesitate to pop it back in the refrigerator for a few moments.
Fold the strips to the middle, slice into cookies and place seam side down on the parchment-lined baking sheet. I had a fair amount of scraps that I baked just for fun.

trimmings
After 20 minutes at 350 degrees F, the cookies was perfect! Golden on the bottom and very fragrant. I knew they were super hot, but I had to try one right of the oven. It was so, so delicious!

stack of cookies
To print this recipe, click HERE
Fig Cookies
Fig Filling
1 1/2 cup chopped figs (about 10 ounces)
3/4 cup red wine
1/3 cup sugar
1 tsp lemon zest
1/4 tsp salt
1 4/ tsp black pepper or 1/2 tsp anise seeds (optional)
Dough
1 stick unsalted butter, softened
1/2 cup sugar
1 tsp vanilla extract
1 tsp grated lemon zest
1/2 tsp salt
1 large egg
1 1/2 cups all-purpose flour
flour for dusting/rolling
For the Filling:
In a saucepan, combine all all the filling ingredients. Bring the mixture to a boil, then reduce to a simmer. Simmer until most of the liquid has reduced and the figs are tender. The spread will have about 1/2 cups of liquid with the soft figs. Allow the mixture to cool in the pan while you assemble the dough.
For the Dough:
With a mixer, mix the butter and sugar until it’s light and fluffy. Add the salt, zest, and vanilla and mix. Add the egg, and mix. Reduce the speed of the mixer and add the flour. Mix until just combined. Remove the dough from the bowl, and make 1 or 2 rectangles. Wrap with parchment paper and chill for 20-30 minutes or until cool and firm to the touch. It’s a little easier to work with two smaller pieces of dough.
For the Cookie Assembly:
Preheat your oven to 350 degrees F. Place a rack in the center position.
Dust a piece of parchment paper (large enough to roll the dough on) with flour. Place the dough on the parchment, dust, and cover with another sheet. Roll the dough to approximately 1/8” thick. You should have a rectangular shape, 12” tall and about 7-12 inches wide depending on the size of your piece of dough. Carefully cut the dough in 3 inch wide strips. Don’t worry about separately the strips. Using a pastry bag or plastic big with a 1/2 “ tip, pipe the fig filling down the center of each strip about 1/2” wide. Be careful not to overfill the strips.
If the dough is soft, you may want to re-chill for 5 minutes or so. When you’re ready, carefully fold the side of the strip toward the center. Slice the strip into cookies, about 1 1/2 inches long, or to your preference. Place on a parchment-lined baking sheet seam side down. Bake for 20 minutes, or until the bottoms of the cookies are golden brown. Repeat if you used two pieces of dough.
Makes 24-36 cookies, depending on size (and rolling/folding skill)
Adapted from Food and Wine Magazine 2012
Cream of Cauliflower Soup - Sans Cream

It's the time of year when it's easy and almost expected to overindulge. Cookies, candy, hot chocolate, dips... it's everywhere and so hard - at least me- to resist. Enter healthy soup! This is the recipe for those looking for something creamy and fancy with any guilt. It's easy to make and is very impressive. I would go so far as to suggest that those who don't like cauliflower will like Cream of Cauliflower Soup. I like to rate recipes on Gary's "oh yum" scale. This got two "oh yums". He's a huge fan of creamy, velvely soups, and this one glistens with goodness. The recipe is from French Fridays with Dorie, and can be found at food.com, among other sites. It's not too late to pick the book ... or add it to your list for Santa! As you're preparing for the holiday season, you may be finding your refrigerator a little cramped and in need of some paring down. If you have a few less than perfect carrots, some wilty celery and a few onions, you're half way there. Your kitchen will be filled with the wonderful smell of roasting vegetables as you roast the onions, garlic, carrots, leeks and celery.
If yo're in a hurry and just want the soup NOW, pick up a quart of vegetable or chicken stock, chop the cauliflower and add it the the herbs. In 20-30 minutes, puree and you'll have great soup. If you're a stock maker like me, you can make your own stock. It will add about 1-2 hours more, but I think you'll be very pleased with the results.

I roasted mine for about an hour at 400. There was lots of great caramelization on the vegetables.

The key to the golden color is to roast the vegetables long enough, and to deglaze the pan. Just put the sheet pan over a burner, turn on the hear, and add about a a cup of water or wine. The crispy brown bits (fond) will lift off, and the whole works goes into your stock pot with the veggies and water to simmer.
The stock simmered away for about one hour. Time to stain the pretty broth from the vegetables.

I used the cotton strainer designed by Michael Ruhlman to separate the solids from the stock. It you haven't found these already, go to Open Sky and pick up a set. They would also be a great present for the cook in your life. They wash easily and are easier to handle than cheesecloth.

Once the stock was complete, I sauteed new onion, and leeks, and added wth cauliflower and herbs. The new soup simmered about 30 minutes. After a good puree in my beloved Vitamix, the soup was finished. Rich, golden and warm with an amazing aroma.

I hope you'll try this over the holiday season. Serve it is little espresso cups with a dollop of Cream Fraiche, a little cheese or go fancy schmancy with a touch of caviar.
Jumbo Marshmallows

Some things in life just make you happy. Big fluffy marshmallows are perfect treats. My little friend Maeve turned four recently, and I wanted to send something extra special to her birthday party. Big puffy marshmallows were perfect. They are so much better than store bought, and can be cut into just the right size. I like the big cubes, but you can cut them smaller if you like. You might want add color, flavor or just keep them plain old white. These are delcious, and paired with a cup of cocoa or turned into a s'more, they can't be beat. I promise, they're not too hard, and are well worth the effort.
marshmallows1-web
To print this recipe, click HERE
Jumbo Marshmallows
1 cup cold water
3, 1/4 ounce packets unflavored gelatin
2 cups granulated sugar
2/3 cup corn syrup
1/4 tsp. salt
1 cup powdered sugar
Using shortening or cooking spray, grease an 8 inch pan. Sprinkle with powdered sugar to cover in a generous coating.
Fit a stand mixer with the whisk. Empty the packets of gelatin into the bowl, and cover with 1/2 cup water.
In a medium/large saucepan, combine the sugar, 1/2 cup water, and corn syrup and salt. Attach a candy thermometer to the side of the pan and heat the mixture until the thermonmeter reads 240 degrees F. Don't stir the mixture..
Very carefully, pour the hot sugar mixture over the gelatin with the mixer running at low speed. Be careful not to pour on the whisk or the sugar will splatter. Slowly increase the mixer speed and whip until the marshmallow is cool and the bowl feels cool to the touch. This will take about 12 minutes, or longer. A double batch will fill a mixing bowl and take about 25-30 minutes to cool. Note: your mixer may get warm or overheat...
Pour and scape the marshmallow into the pan and smooth. You may want to use a wet spatula if the mixture is hard to spread. Dust with powdered sugar and allow to set overnight uncovered. After the marshmallow has set, turn out on to a cutting board and cut into cubes. A straight down cut works easier than sawing motion. Dust the marshmallow with powdered sugar to prevent sticking. Store well wrapped at room temperature for up to 2 weeks.

three-marshmallows-web
Gingerbread Cakes

What a day! What a week! I'm happy to be back baking and blogging. Holiday decorations are going up, and I'm starting to get in the spirit. I hate to admit it, but I'd like a little snow instead of the balmy 60 degree days we've been having. I'm sure I'll regret that thought about February. I'd like to start off by wishing a big Happy Birthday to my husband, Gary! The kindest, sweetest person in the world. It's been a big year for him. Recently, he packed up our Prius and went off to New York City to help with the recovery efforts from hurricane Sandy. No special reason, just overcome with the desire to help. To celebrate his birthday, I've made baby gingerbread cakes.
The recipe coincides with my Baking with Julia blog group. To bake along, you can find the recipe at Karen's Kitchen Stories.
As I write this, I'm still cracking up from my dumb baking blunder. More on that later...
The recipe has some great ingredients including black pepper, cocoa, instant espresso, and fresh ginger. The smells are amazing. I found a tube of fresh ginger in the produce section of the grocery. I liked it a lot. It was very smooth, and made for easy measuring and smooth fresh ginger in the batter. You can see it in the photo in the white bowl off to the right.

This is where the craziness comes in. I bought the cutest little paper cups for holiday baking. They were just a little smaller than 4 inches, but I though they'd be perfect. I could serve the cakes in the papers or unwrap them just before serving. The batter was ready, and I gently spooned the batter into the cups.

After a few minutes, I started to wonder where the cups were getting support as the batter expanded. Guess what? No where! The sides were drooping the batter was oozing out onto the baking sheet. I prepared for round 2 and let the mess finish baking. Here's what happens when you don't have a study container around a paper baking cup. I was able to peel a few apart, and salvage at least a few. I used a 10" cake pan for the next batch, and plan to use it for Gary's birthday dinner tonight. For anyone who's every felt intimidated to bake with me, this should make you feel much better!

I'm still crazy about the little red cups, and will plan to use them again. I just can't quite figure out what kind of pan to use do the contents don't spew out.

The whipped cream was sweetened with powdered sugar and garnished with a few pieces of candied ginger. The reviews so far have been great! I really like the flavor and texture of this wonderful cake.
Spur of the Moment Vegetable Soup (aka Stone Soup)

As I was making the French Friday's with Dorie, Around My French Table soup, by Dorie Greenspan, I was thinking about a few things I want to share with you. They're about chicken stock. Have we talked about stock before? Of all the things to make at home, I think this tops the list. It's inexpensive to make and so much better than you can buy. About three Thanksgivings ago, I was at my sister's house. We had finished our feast and were dividing the leftovers between the families. Her mother-in-law asked if we would like some turkey. I'll never forget the look on her face when I asked, "Could I have the carcass?" To me, that was the best part to take home. I'd add some carrots, celery, onion, garlic, and peppercorns to the carcass with lots of cold water, and start the simmer. From that big bird, I'd have 7 or 8 quarts of liquid amber stock ready for the freezer.
I usually don't make stock with whole chickens. It's always a carcass from a chicken I've baked. True confession... I even make stock from the deli chicken we pick up in a pinch. The stock is a little saltier, but really good.
In the time it takes you to watch an evening of TV, a few football games, or just putter the day away, you can make chicken stock. Here are the steps, tips and tricks I've learned along the way.
To print this recipe, click HERE
Chicken Stock
In a big stock pot (as big as you have), add 1-2 chicken carcasses or 1 whole chicken. Wings, necks and backs are great to keep in the freezer for stock day.
Add:
2-3 carrots, cut into thirds
2-3 stalks celery, cut into thirds
1-2 medium onion, quartered
1-2 cloves of garlic, smashed
8-10 whole peppercorns
1 bay leaf
1-2 turnips or parsnips if you have them
1 leek, if you have one - cut into pieces and very well washed. You don't want grit in your stock.
If you have any leftover roasted vegetables from your chicken, add those too.
Any combination of herbs including rosemary, thyme, oregano (I add a spring of fresh thyme and a small spring of rosemary)
Fill the stock pot with cold water, about 2 inches from the top. Depending of the size of the stock pot, you'll have a few quarts of liquid.
Turn on the heat, and bring the stock to a very long simmer. You may have some scum float to the top. Skim that off and discard.
Don't stir the stock, just let it simmer undisturbed. Be sure not to let it boil to hard, or that will make if cloudy. You can put a cover over the pot, but keep it ajar. Check if periodically, adjust the heat to maintain the low simmer. There should be tiny bubbles around the edges and near the surface, but nothing too forceful. You can let the stock simmer for several hours. The longer it simmers, the deeper the flavor and richness of the stock. You will loose some of the liquid. It may reduce, but you can add more water if desired.
When you're ready to finish the stock, line a colander with cheesecloth or a clean handkerchief that you don't mind getting "stocky". Using a large bowl or another pot under the colander, gently press a ladle against the surface of the stock removing the broth, and strain through the cheesecloth into the bowl. Try not to stir. You'll get some chicken bones and vegetable pieces in the colander. It's okay.
When you have most of the liquid out of the pot in the second bowl or pot, discard the solids.
Here's an important food safety tip: Get the stock COLD quickly. Bacteria will double every twenty minutes when the temperature is between 40 and 140 degrees F. I make an ice bath with cubes and water, and place the bowl with stock the bowl of ice water. If you have a lot of stock you may have to work in batches. It may also take more than one batch of ice water. When the stock feels barely warm to the touch. Transfer to the storage container, label and place in the refrigerator for three days or into the freezer. I like to put in the the frig overnight, and skim off any fat that floats to the top, then freeze.
When you're ready to use it, I run the container under warm water, release the stock cube, and put it in the soup pot frozen. It melts quickly and cuts the time needed to defrost. For risottos and dishes requiring warm stock, I thaw in the microwave or in the refrigerator overnight.
I use one quart deli containers and freeze about 3 quarts at a time. I bought a case of containers and reuse them as much as I can. Maybe I should put sets of 6 in the shopping area of the website so you can have access to them too.
I want to tell you that Michael Ruhlman, a fantastic writer and chef has invented reusable straining cloths. They come in three sizes and work really, really well. If you're planning to be a stock maker, I suggest investing in these guys.
Now on to the soup recipe!
Our refrigerator is still full of vegetables from our CSA. In addition, one of my cooking school students brought me a bag of the most gorgeous carrots. They're huge! I took a picture of them, and then decided you needed a reference to see how big they really are so I added the pencil. Here they are! That's a regular pencil next to them. Aren't they amazing?!?

carrots-1
I took several liberties with the Around My French recipe, adding a few more kinds vegetables, and a few other herbs and spices. The soup is delicious! I didn't puree mine, though that would be great too. The carrots, celery, onion and potatoes are the heart and soul of the recipe. Any other vegetable you can add are a bonus. I debated on green pepper and decided to leave it out for fear it would be too strong.

vegetables-2

stone-soup-4
Here's my version:
[print_this]
Vegetable Soup
1 pound carrots, washed/peeled and cut into small pieces
3 stalks celery, washed and cut into pieces
1 onion, chopped
1 leek, well washed and sliced (white and part of light green parts)
2 cloves of garlic, peeled and chopped
3 small potatoes
2 turnips
1-2 small pak choy, chopped with tender greens
1-2 tsp salt
1 tsp black pepper
1/2 tsp ground ginger
1/4-1/2 tsp crushed red pepper flakes
1 tsp dried, or 2 sprigs fresh thyme
1 -2 sprigs rosemary
2 sage leaves or 1/4 tsp dried sage
2 T butter
1 T olive oil
6 cups (approximately) chicken stock (low fat/low salt if possible)
The ginger adds a subtle note that is hard to describe. I would consider this a secret ingredient with a certain je ne sais quoi.
Heat the butter and olive oil in the bottom of a large stock/soup pot. Add the onions, leek, garlic, and carrots. Cook over medium heat until the onions begin to look translucent. Add the herbs, and remaining vegetables. Increase heat to bring to a boil, then reduce to a simmer. Simmer soup for 20-30 minutes until the turnips and potatoes are tender. Adjust seasonings, adding salt and/or pepper as desired. Thin if necessary with more stock or water. Remove herb sprigs and serve! If you would like to serve a smoother soup, you could use an immersion blender or blender to puree to desired consistency. Serves 6
[/print_this]

Vegetable Soup
Butternut Squash Soup with Apple and Bacon

Fasten your seats belts, this a recipe you'll make again and again. I've been making it so long, I'm not even sure where the recipe came from. This recipe is a standard in my Autumn Soup class. It's easy, and SO good. My friend Meghan gave the recipe to a local restaurant and asked them to make it for her bridal shower. People loved the soup. Even those not too keen on squash soup. It can be a fancy appetizer course or a casual supper. The bacon and apple make it sweet, salty and savory. It's got Fall written all over it.

soup-ingredients-1
Here are the top three reasons I love this soup (as pictured above):
1. I love butternut squash
2. I love leeks, onion, and garlic
3. Can I love more things? Bacon, Sour Cream and Apples
To start your soup, find a nice big pot, and fry the bacon strips in the bottom. Place the bacon on a plate with a paper towel, to drain and cool. Then chop into little garnishing pieces and set aside. If you have a lot of drippings, pour some off. Keep about 1/2 - 1 Tablespoon in the pan. Add a little olive oil if you need it, and then add the onion, garlic, and leeks. Cook until the onions are looking clear. Now add the chunks of squash, the apple, chicken stock, water and a bay leaf. Add some salt and pepper, and simmer. Fifteen minutes. Yes, you read that correctly. Just 15 minutes, and your squash should be tender.

soup-ready-for-the-blender-2
The soup after the simmer, ready for the blender.
Here's where you can be creative. If you like your soup chunky, you could mash it, or use an immersion blender to make it smoother but chunky. I'm a smoooooth soup person. Think liquid velvet. I use my VitaMix and whirl it to smooth. You could also use a food processor or blender. Just please be careful. The soup is very hot, and any of the tools can spew soup without warning.
After you've arrived at your desired consistency, Ladle your pretty soup in a bowl and garnish with sour cream/Greek yogurt/creme fraiche, the bacon pieces and even some diced apple.
To print this recipe, click HERE
Butternut Squash and Apple Soup with Bacon
2 slices bacon
1 medium onion, chopped
1 large leek, chopped (both white and light green parts)
1 - 2 garlic cloves
1 bay leaf
1 1/2 pounds butternut squash, seeded and chopped into 1 inch pieces (about 1 medium/large)
1-2 apples (seeded, peeling and chopped)
2 cups chicken stock
1/2 cup water for thinning soup
Sour cream, Greek yogurt or Creme Fraiche for garnish
In a stock pot or large pan, cook the bacon until crisp and drain. Reserve 1 T fat. Crumble/coarse chop the bacon.
Cook the onion, leek and garlic in the reserved fat. Stir until softened.
Add the squash, apple, bay leaf, stock and 1/2 cup water. Bring to a boil, reduce to a simmer. Cover and simmer for 15 minutes or until the squash is very tender. Discard the bay leaf. Season with salt and pepper to taste.
Transfer soup to blender and puree in batches. Transfer pureed soup to a clean saucepan. Adjust seasonings as desired.
Either whisk in 2T of sour cream or ladle soup into bowls and garnish. Add bacon to the top of the soup and serve. Makes about 4 1/2 - 5 cups.
soup-in-small-bowl-3
Bagels! Baking with Julia

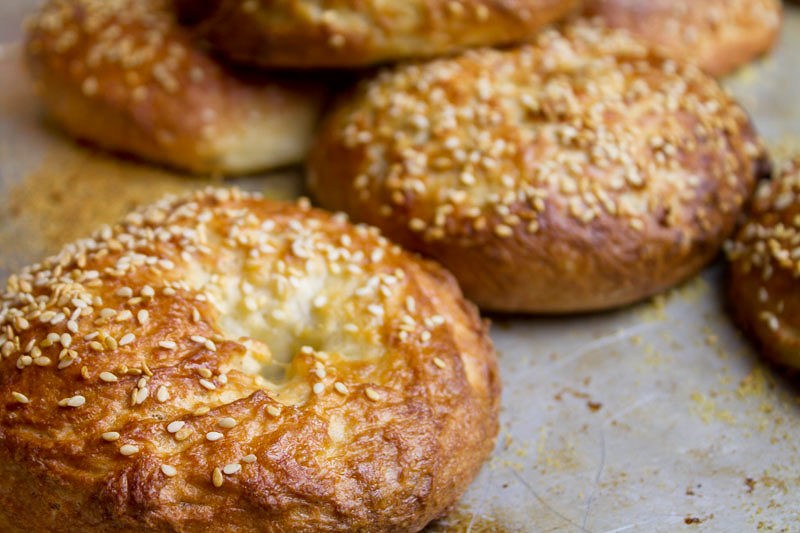
I'm not sure how to spell it, but all I can say is Ei-yi-yi! This recipe had it's moments, but I'm happy to report that they're really good. This week's Baking with Julia recipe is bagels. I was driving last week and heard a public radio interview of the book helping us know what to make from scratch, and what to buy already made. About half way through this recipe, I thought I clearly knew the bagel answer. Buy them. When they came out of the oven, so pretty and delicious... it's a coin toss. It was worth the effort and fretting.
Our host this week is Heather, from Heather's Bytes. She'll have the recipe, and her tips and tricks at her blog.
When I was in college I had three roommates. We loved to cook - make that experiment. There were a lot of firsts. Quiche, soups, ethnic recipes, pretzels, breads...and bagels. I don't remember the bagels being bad, nor good. They must have been college student edible. It was fun to revisit bagels again. This time with a few more skills and baking experience.
The dough went to together easily. The rise was right on time, and into the fridge went the dough. So far so good. After the chill, I started with stock pot of water, added the baking soda/sugar and began shaping the bagels. The dough is sticky and tricky to get into the balls. I never did quite master the twirl, but I got them into the boiling water. As they boiled, they puffed and looked like squishy dumplings. As they were bubbling away, I was getting ready to tell you about my disaster. I'm happy to report that after I put them in the oven, the texture evened out, and the surface began to look like a bagel, a REAL bagel. The timing was perfect, and out of the oven they came. The inside texture was nice, and the taste was really good.
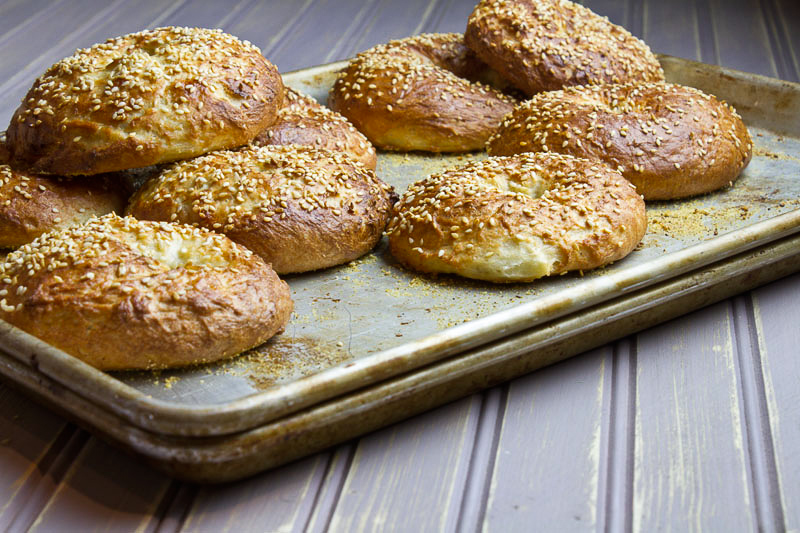
If you're a bagel lover and looking to try something fun, give the recipe a try. Top them with your favorite sesame, poppy or crunchy seed and enjoy!

Cranberry Walnut Pumpkin Loaf - Baking with Julia

This recipe is the essence of autumn. Our host this week is Rebecca from This Bountiful Backyard. Rebecca will have the recipe on her site when you're ready to make is extra special treat.
The cranberries proved to be a little more difficult to find than I expected. I went into the grocery expecting to find a huge pile of bags. Not one. I checked the frozen fruits, none. I went back to the clerk and asked about cranberry whereabouts. She told me "it's not cranberry season." What? It's fall for crying out loud, and it's Cranberry Festival in Warrens, WI. How can they have cranberry festival without cranberries? I mentioned my dilemma to my friend who just by luck had some frozen in his freezer. I only needed 2/3 cup, so we were back in business.

cranberries
The title of the recipe sounds like a quick bread, doesn't it? It's not. It's a yeast bread. It rises once, then into the fridge overnight. After a long wake up (3-4 hours) to warm to room temperature, it's then shaped and rises one more time. The actual hands-on time was about 15 minutes. Please don't let the long resting times scare you. It's well worth the wait.

ingredients-1

dough-in-mixer-2

dough-first-rise-4
The recipe mentions using the dough hook to combine the dough like brioche. This gave me an idea. Since I don't have any little pans, making the loaves the bread in the style of brioche in brioche pans might just work. After the long overnight rise, I divided the dough into 4 large portions, and 6 smaller.

brioche-tins-horz-8

in-brioche-tins-5
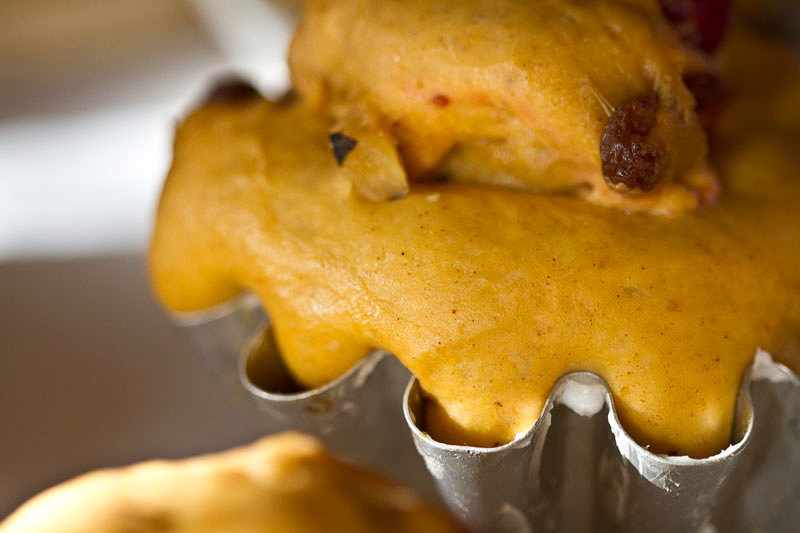
ready-for-oven-6
After the second rise, the autumn brioche were ready for the oven.
When they first came out of the oven, there was a moment of panic when I tugged on the sweets balls of bread and they showed no signs of wanting to release from the brioche pans. Never fear, after a few minutes of cooling they popped right out the tins.
I really like the flavor of the bread. Very subtle pumpkin flavor, nice texture with the walnuts, then bang! A burst of cranberry. I added a smear of butter when I tasted mine. Then I had an idea (flash!). Orange goes so well with all the ingredients, how about an orange butter to go with the bread? I know, there's plenty of butter in the recipe, but it just needs a little something. I thought about making slices of French toast, and using the orange butter, with some maple syrup. Doesn't that sound great? Or, even better... cubing the bread and making a wonderful bread pudding for brunch. The options are endless.
Here's my recipe for Orange Butter. It's SO good on the pumpkin bread. Just refrigerate if you don't use it all right away.
To print this recipe, click HERE
Orange Butter
1/2 stick (4 T) Salted butter, at room temperature
zest of 1 orange
3 T powdered sugar
Combine all the ingredients together, and serve.

Orange butter

horizontal-brioche-11

bread-with-butter-13
Chicken Basquaise with Shepherd's Bread
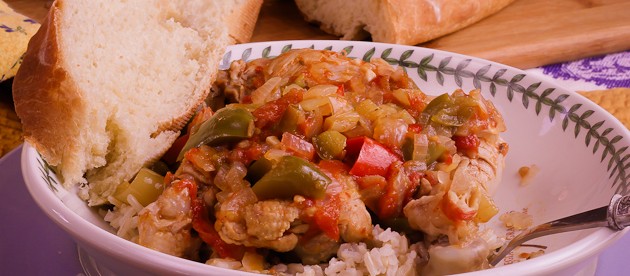
We've got a chill in the air, and it's time for thick soups and stews. Today's recipes are truly a salute to late summer. Our CSA has provided us with a bounty of peppers and tomatoes, and I'm happy to put them to use in the Chicken Basquaise recipe. I also had the treat of using a locally grown chicken. This recipe is great because you can make it with only chicken thighs or wings if you like. The meat will simmer and be nearly falling off the bone when it's served. I decided to serve ours over brown rice. What's Basquaise, you ask? It means in the style of the Basque region. A region on the border of France and Spain. The foods are unique, simple and hearty. Chicken is browned and combined with a onions, garlic, tomatoes, white wine, and thyme. The vegetables are simmered first, until tender, then the chicken is added. the mixure simmers for 45 minutes, until the chicken is tender. I let mine simmer longer, for "falling off the bone" tenderness.
For a little extra punch and flavor of the region, you can add a pinch of chili powder.

Summer vegetables
I had a blast peeling and chopping the tomatoes. They were SO juicy and flavorful. I had to take a picture as they were almost ready to drip off the cutting board.

Chopped Tomatoes
On to the bread. This recipe is absolutely delicious. Serve it with any meal, make toast, make crostini, just make this bread! Be patient, though. It's sticky and a tad bit tricky. I know you can do it!
As I read through Basque recipes, I learned the shepherd would place bread dough in a special iron pot and bury it in the coals of his campfire in the morning. After tending the flock all day, he would return to the pot of bread, which would be ready. The first piece would be cut from the top and given to the sheep dog. Since my dogs are herders (in need of a herd), this is for them. They didn't get any bread, but were very interested. The aroma and flavor of this bread is amazing. I didn't add the sage, but I know it would add great flavor.
To print this recipe, click HERE
Basque Shepherd's Bread
Yield: 1 Loaf
SMALL LOAF
3/4 c Water
1 T Olive oil
1 3/4 c Unbleached all-purpose flour
1 T Sugar
1 tsp Dried sage
1 tsp. To 1 tsp. salt - to taste
1 1/2 tsp Active dry yeast --- or---
LARGE LOAF (or 2 smaller loaves)
1 1/4 c Water
2 T Olive oil
3 c Unbleached all-purpose flour
4 tsp Sugar
2 tsp Dried sage
1 tsp To 2 tsp. salt - to taste
2 tsp Active dry yeast
Add all the ingredients together in a bowl, and mix well with a wooden spoon. When dough is no longer shaggy, turn out onto the counter, cover with the bowl, and allow it to rest about 5-10 minutes. Then, using a bench scraper to help, pull the dough toward you, fold over the top, pick up the dough and slap (upside-down) on the counter surface. Repeat until the dough no longer sticks to the counter. The dough will be smooth, very loose, and a little sticky. Use a dusting of flour to help shape the dough into a ball. Allow the dough to rise for about an hour until doubled. I used a baguette pan, and made a long loaf shape which was contained by the sides of the pan. You could use a cast enamel pot or bread pan to contain the bread. Allow the bread to rise a 2nd time for about 45 minutes. Bake at 350 for about 30 minutes, or until the loaf is golden brown and the internal temperature is 180 degrees F.
Here's the whole meal, tender chicken, aromatic vegetables in very flavorful broth, and warm wonderful bread. Let me know how your bread turns out! Stop by soon, I have a great apple dessert recipe for you.

Chicken Basquaise
Whole Wheat Bread
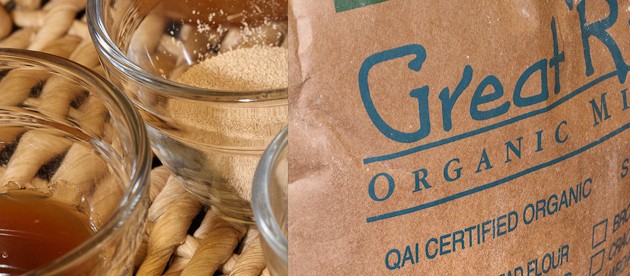
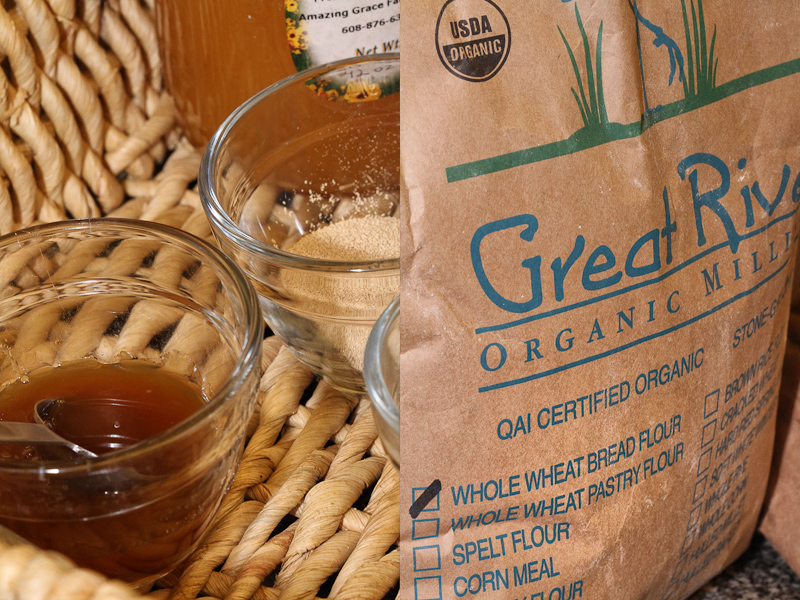
Grown up flavors. Greek yogurt, Russell sprouts, spinach, rutabaga. I may need to add whole wheat bread to the list. I'm old enough to have grown up on white bread. No, not the "W" bread, but white bakery bread. We'd stop by Lanes and have a few loaves sliced for the week. I really don't remember seeing whole wheat bread until college. I can't say I loved it at first bite. My roommates and I tried to make it, and it was a much better door stop than bread. Over the years, I've grown to like it. In fact, I prefer it now. Fortunately, little kids today see plenty of whole grain breads. I'm assuming they've acquired a taste for them. I've learned the key to making is good hydration of the flour and plenty of kneading. This summer, we've been making whole wheat bread each week for the farmers' market using a recipe from the Great River Mill. Our recipe uses both whole wheat and 7 grain flour, and lots of honey. Here's another twist on whole wheat bread using whole wheat and white wheat flour.
Our Baking with Julia recipe this week is wonderful whole wheat bread. I don't want to scare anyone who might want to try this as the first bread they make. I think white bread is a little easier to start with, but this one is very forgiving and you should get good results with the recipe.
To get started, you'll need the recipe. It's in Baking with Julia, or join this week's hosts are Michele of Veggie Num Num, and Theresa of The Family that Bakes Together. Just head to their sites, and you'll find the recipe.
Now on to assembling all the ingredients. You'll need both all-purpose and whole wheat flour. I'm crazy about Great River Milling Company. It's here in Wisconsin near La Crosse. You can go to the mill and pick up big bags, or better yet, you can have it sent to you via Amazon. They have it set up so the shipping is free for the 25# bags. I'm not getting a commision, promise! The Great River Whole Wheat flour is organic and a perfect texture. If you don't have the time or inclination to use this flour, pick up a bag of whole wheat flour at your local grocer. For the all-purpose flour, be sure that it's unbleached and unbromated.
The recipe also calls for malt syrup, commonly used in brewing. If you can't find it, you can use molasses, corn syrup, or just skip it. The aroma is wonderful and it helps to condition the dough. Look at the gorgeous color!
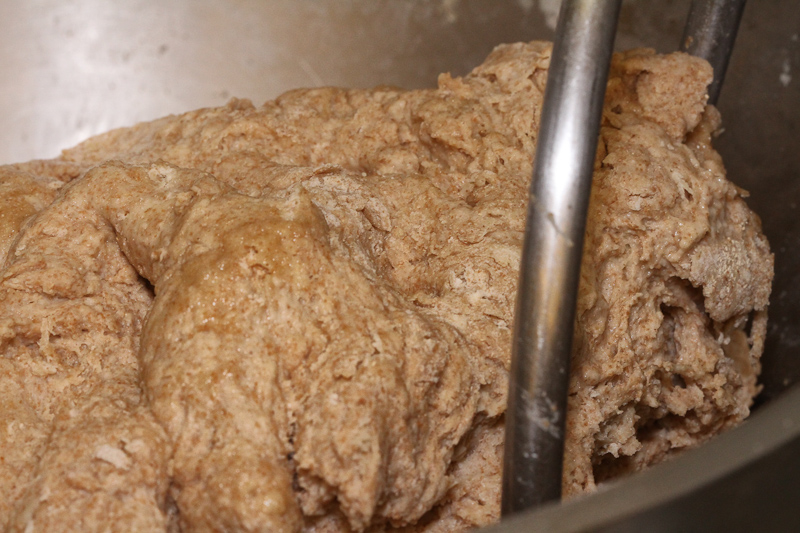
The dough will go together very nicely. Remember, that adding water to flour creates gluten. Gluten is the structure that holds the CO2 the yeast gives off as it metabolizes the sugars in the dough. Kneading and rest develop the gluten. Be sure the check that you've got good gluten develpment by gently stretching a small piece of dough. You should see a translucent "window" of dough. If the dough rips, rest the dough, then keep kneading.
I used my kneading machine for about 4 minutes, then rested the dough (autolyse), added the salt and finised kneading by hand. I added about 1 cup more water than the recipe called for . I like to work with dough that has more hydration. You'll find the perfect hydration for you. I'm sure the recipe will work well as written.
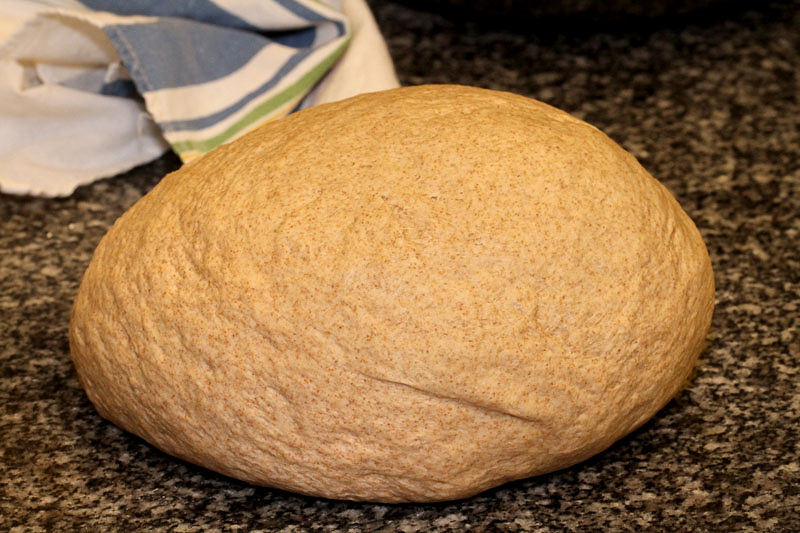
The dough rose according to the schedule and shaped easily into the pans. I made a double batch so I had four loaves, each weighing about 775 grams or about 1.7 pounds. Good hearty loaves!
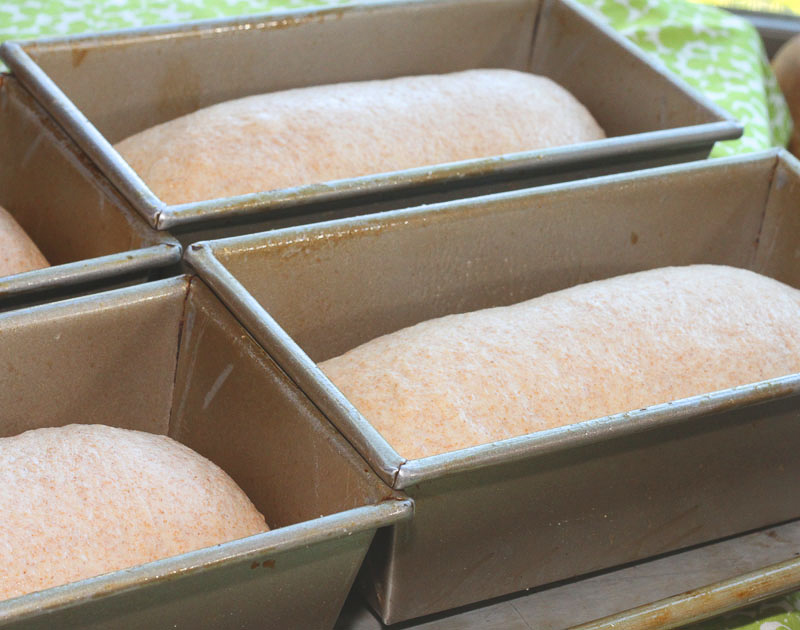
After an hour, and bread had risen to about 1 - 1 1/2 inches over the top of the pans. Into the oven it went. My loaves backed for 45 minutes to reach an internal temperture of 180 degrees F. They easily released from the pans to cool. The knobby loaf in the back had lots of bubbles under the surface. Not pretty, but still delicious!
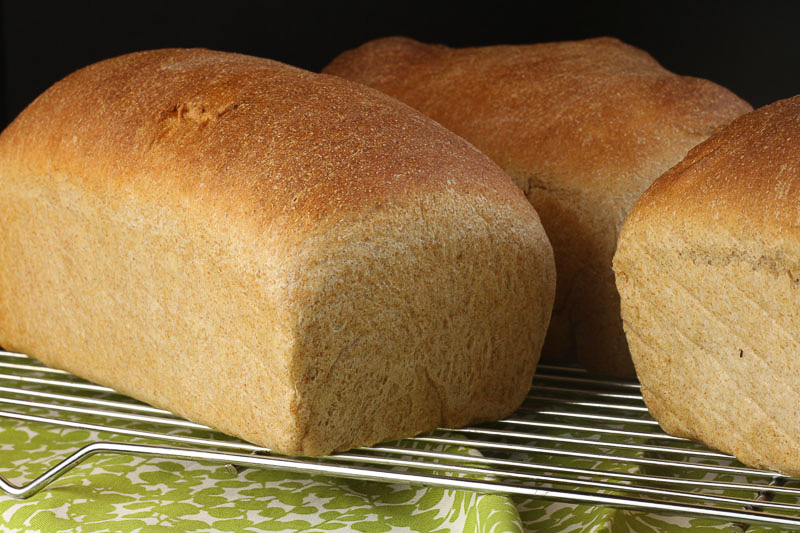
Time to slice the bread... Enjoy, and talk to you soon!
Rich Chocolate Cake (plus... a treat for gluten-free bakers!)
There's a chill in the air, and it's time to start baking! Something warm, comforting and delicious. Here's just the dessert. You'll love this one! I made this cake for Gary about 25 years ago. (and ever since...) It was a surprise for a his birthday. We weren't really even dating yet, but I think this may have sparked the flame. Our friends just celebrated their 45th anniversary and I made this for them. It's very romantic, and perfect for a party. The best news... I substituted Cup 4 Cup gluten free flour, for the wheat flour. It worked perfectly. No one could tell the difference including me. Here's the recipe that will make you a star as the holidays roll in. Everyone I know loves this cake. It's dense, very chocolatey, and even appeals to those who claim not to really like chocolate. You can serve it at room temperature or cold. Invite friends because one cake goes a very long way since it's so dense. The ingredients are pretty simple. Melted chocolate, butter, a dozen eggs, sugar and some flour. I bet I had you at melted chocolate. I used Cocoa Barry 58% French chocolate. Use any bittersweet/semisweet you like. Just not milk, it will be too sweet.
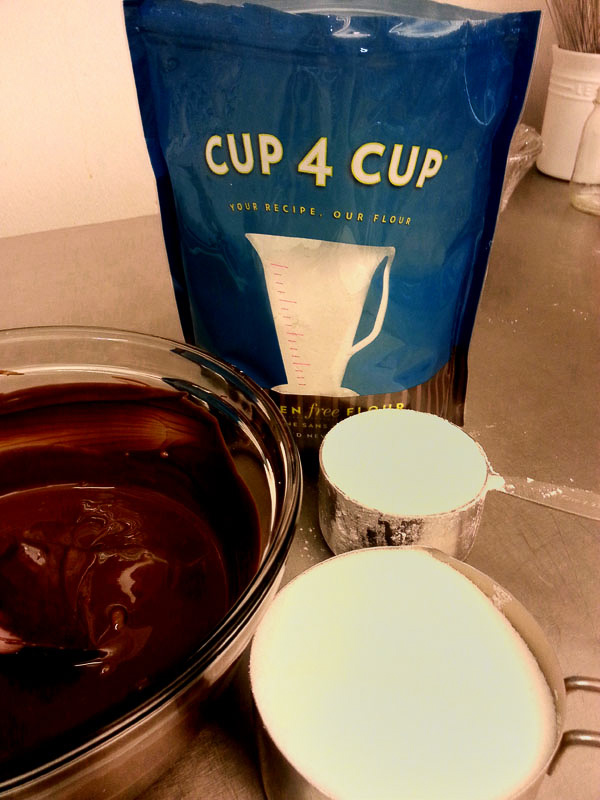
cup4cup-1
My Lost Crates box this month from Joy the Baker, included vanilla beans, vanilla extract and a big bag of Cup 4 Cup gluten free flour by Thomas Keller. When Chef Keller does something, it's always great. The flour looks and feels like wheat flour. No funny taste, smell or texture. I would highly recommend going finding some right away and giving it a try. If you have a moment, follow the link to Lost Crates. It's always a surprise and very fun!
To print this recipe, click HERE
Dark Chocolate Cake
14 ounces semisweet chocolate (the darker, the better
12 eggs, separated
2 cups granulated sugar
3 1/2 sticks butter, softened
1 cup unbleached flour, sifted (or 1 cup Cup 4 Cup flour)
Confectioner's Sugar for serving
Preheat your oven to 325 degrees F. Butter and sugar an 10 inch spring form pan. Tap out any excess sugar.
Break or chop the chocolate into small pieces and melt in microwave or in a pan placed over another pan of barely simmering water. Stir until smooth, and cool slightly. Be careful not to burn the chocolate.
Beat the egg yolks and sugar until they are pale and light yellow. When you lift the whisk or beater over the mixture, there should be a ribbon of the mixture that falls from the beaters and gently lays on top of the egg/sugar mixture. Add the chocolate and mix thoroughly. Stir in the butter, and flour.
In another bowl, beat the egg whites until they are stiff. Spoon a spoonful of the chocolate mixture into the egg whites and mix. Then add the egg whites to the chocolate mixture, folding very gently until mixed. Be very careful not to overmix, or deflate the batter.
Pour the batter into the prepared pan (it will come close to the top) and set on the rack (middle rack) and bake for 1 hour and 20 minutes. A cake tester or toothpick should come out clean when inserted into the center of the cake. The cake will rise and crack, but will settle as it cools. Cool on a rack for 15-20 minutes, then release the ring of the springform pan. Allow the cake to cool, then refrigerate until cold. It's best to wait until the cake is cold to remove the bottom of the springform.
To serve sift with powdered (confectioner's) sugar, and some whipped cream, if desired. Makes 20 servings (small... but rich)
Adapted from The Silver Palate Cookbook.

chocolate-cake-1
Here's the cake on it's pedestal at the anniversary get-together. I wish you could smell it... it's SO good.
I'd love to hear how your cake turns out! Cheers.
Nectarine Upside Down Chiffon Cake
this is my invariable advice to people: Learn how to cook, try new recipes, learn from your mistakes, be fearless, and have fun. Julia Child. From My Life in France.
This has been my mantra for the past week getting ready for this recipe.. Learn from your mistakes, try something new, have fun, try new recipes, have fun... be fearless. Got it!
As one of this week's Tuesday's with Dorie recipe hosts, my job is to provide the Nectarine Upside Down Chiffon Cake recipe, and give you the best tips and tricks I can. Marlise, from The Double Trouble Kitchen, is your other host. I've been wanting to be a host for a long time. I'm so happy to provide you with the recipe and be one of the "blogs of the month"! It takes me back to being the child in school who got to pass out the graham crackers, or put up the calendar numbers on the bulletin board. When I saw the title, my first reaction was, chiffon? Oh boy... I really wanted, and hoped it would be fine on the first try. After all, I'm supposed to know what I'm doing and be able to teach others. Time for some fun and fearlessness.
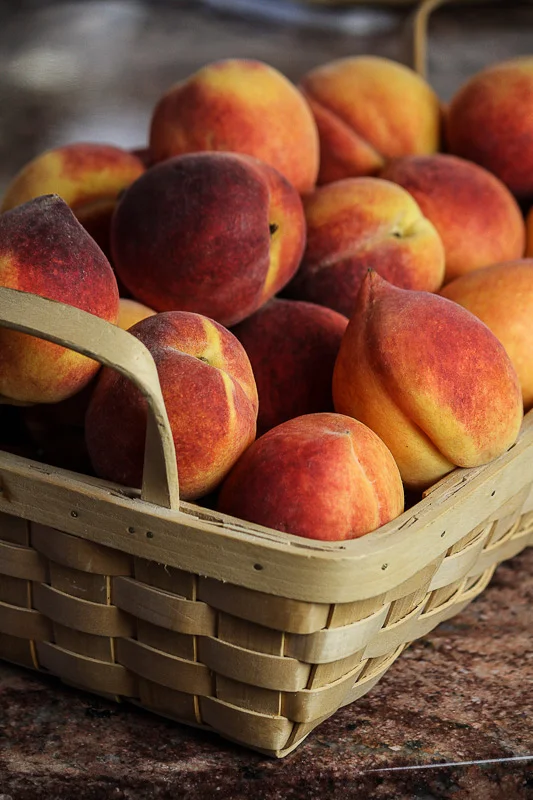
peaches-in-basket-1
This is a grand, big girl/boy recipe. It's a boeuf bourguignon of desserts. Multiple steps, a few tricky details, and magnificent results. I know you can do it. Follow the recipe and the tips, and you'll have a great, fancy dessert to share.
The first step was to find a 10" spring form pan. I rummaged through my collection of pans, got out the ruler to measure, and ta-da... check. Don't be tempted to use a smaller pan. The recipe just fits into the 10" model. If you must, just don't put all the batter into the pan. It will be almost to the top.
This recipe used the last of my vacation peaches. What a perfect recipe for such wonderful fruit. The recipe calls for nectarines, so what's the difference? Peach fuzz. I popped the peaches in boiling water, counted to 20, rinsed under cool water, and slipped off the peels. They were juicy, and perfect for the recipe.
You'll start the recipe by melting some of the butter in the bottom of the pan, adding brown sugar, and arranging the sliced fruit on top of the sugar. Not so bad at all. Be sure to wrap your pan in foil so the butter doesn't drip on to the floor of your oven when the cake goes in. Even with the best foil work, you may still have drippage.

Butter Sugar Fruit Layer
Now on to the streusel. I used chopped pecans instead of almonds, and didn't toast them before adding them to the other ingredients. Add the ingredients to the food processor and pulse until you have nice clumps of streusel. The baking time of 12 minutes was perfect. The kitchen smelled great! Warm, buttery and delicious.

streusel-toppping-3
The third step is the chiffon batter. You'll be making a classic French meringue. Be sure your egg whites are in an extra clean bowl, free of any yolk specs. You may want to place the bowl over another bowl of warm water to gently warm the egg whites. They'll whip faster and fuller than if they're cold.
What makes this French meringue? Since the cake will be baked, the egg whites are not heated as they are in Swiss Meringue. The sugar in French meringue is not cooked (that's Italian meringue!). This meringue is medium peak egg whites whipped together at the end with sugar until shiny and firm. This is the easiest of meringues, but still requires special attention. Once your meringue is shiny, and firm, you'll fold it into the yolk mixture.
To fold: Hold your spatula perpendicular to the surface. Cut straight in and down, then follow the edge of the bowl, up and over the top allowing the whites and yolk mixture to gently fall from the spatula. Gentle! Rotate the bowl, about 1/4 turn and repeat. It will take several folds. The batter should be light and homogeneous.
Place 1/2 of the over the fruit, add all but a few tablespoons of streusel, then add and smooth the remaining batter over the streusel. The chiffon cake recipe states that it should be for 45-50 minutes. I checked mine at 45, 55...65...75...85...90... minutes. At this point, I was worried sick, and making plans for a redo, and writing the story in my mind about how I had tried and failed at this classic dessert. Remember... be fearless and have fun! Just past 1 1/2 hours of baking, the cake was firm to the touch and the toothpick came out clean. The surface was golden brown, but I had no idea of what the fruit and sugar were going to look like at the bottom. In another 25 minutes, I'd find out.

Puffed and fully baked
Twenty five minutes later, I attempted to release the springform ring. The edges were stuck and I was about to rip the cake. Whoops! I used a butter knife to gently release the cake from the side of the pan. It released perfectly, and was ready for the flip.
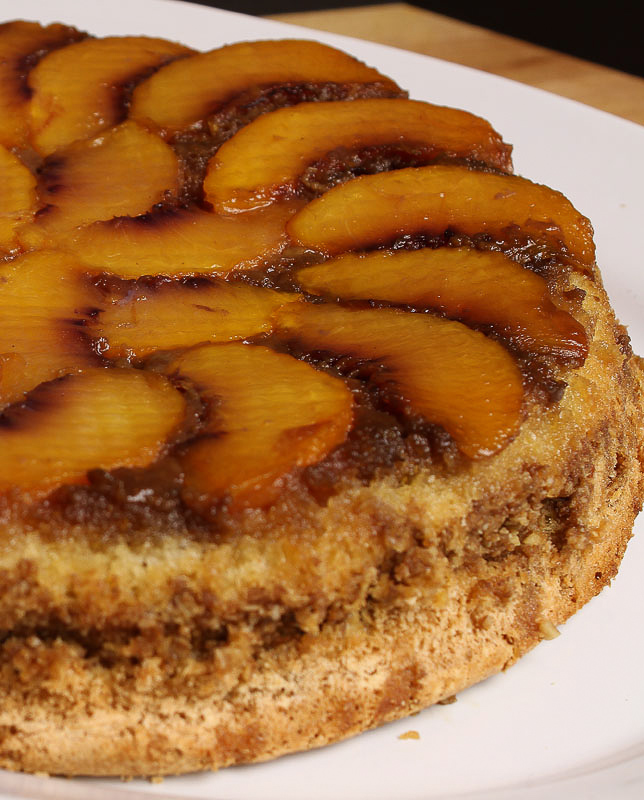
chifon-3-1
You can see the little dimples from the bottom of the spring form pan. A sprinkle of streusel and the beautiful chiffon cake was finished.
To print this recipe, click HERE
Nectarine Upside-Down Chiffon Cake
For the Topping:
1/2 stick (2 oz) unsalted butter
1 cup, packed brown sugar
3-4 ripe medium nectarines (the number will depend on size), each cut into 8 pieces
Center a rack in the oven and preheat the oven to 325 degrees F.
Cut the butter into 3 or 4 chunks and toss them into a 10 inch springform pan that's 3 inches high. Place the pan directly over medium-low heat and melt the butter, tilting the pan so that the butter covers the bottom evenly. Remove the pan from the heat and scatter the brown sugar evenly over the butter, patting it down with your fingertips. Arrange the nectarine pieces in concentric circles over the sugar. For a fancier effect, alternate the way the nectarines face from circle to circle. Wrap the bottom of the pan in aluminum foil to catch any butter that might drip during baking and set the pan aside.
For the Streusel:
1/4 cup unblanched whole almonds
1/3 cup all-purpose flour
1/4 cup packed dark brown sugar
1 tsp cinnamon
1 tsp ginger
1/2 stick cold unsalted butter, cut into small pieces
1/2 cup quick cooking oats, (not instant)
Put the almonds on an ungreased jelly roll pan and bake them until golden brown and fragrant. About 10-15 minutes. Stir frequently so that they toast evenly. To test for toastiness, break on open, it should be light brown in the center. Cool the almonds before proceeding.
Line the jelly-roll pan with parchment paper and keep at the ready.
Put all the struesel ingredients, including the almonds, into the work bowl of the food processor fitted with the metal blade and pulse just to mix the ingredients and chop the almonds and butter. The mixture will be rough and crumbly. Spread the streusel out on hte pan and if you'd like to have a few largish lumps for textural interest, squeeze some the streusel lightly between your hands and then break the big clumps into smaller bits.
Bake the streusel for 10-15 minutes, stirring once or twice, until golden brown. Transfer the pan to a rack an cool while you make the cake. Keep the oven at 350 degrees F.
For the Cake:
1 1/2 cups sugar
1 cup all-purpose flour
1 tsp baking powder
1 tsp baking soda
1/4 tsp salt
4 large eggs, separated
1/2 vegetable or safflower oil
1/2 cup fresh lemon juice
2 large egg whites
Ice cream or whipped cream, for serving (optional)
Sift together 1 sup of the sugar, the flour, baking powder, and baking soda onto a sheet of parchment or waxed paper; add the salt.
In a large bowl, whisk together the yolks, oil, and lemon juice until blended. Gradually add the dry ingredients to the yolk mixture, whisking all the while; set aside.
Beat the 6 whites in the bowl of a mixer fitted with the whisk attachment, or work with a hand-held mixer. At low speed, beat the whites until thy're foamy and form very soft peaks. Increase the mixer speed to medium -high and gradually add the remaining 1/2 cup sugar, beating until the whites are thick and shiny and hold peaks. (If you run a finger through the whites, it should a leave a smooth, even path.) Fold about one third of the whipped egg whites into the yolk mixture to lighten it, then turn the yolk mixture into the whites and fold it in gently but thoroughly.
Baking the Cake: Pour and scrape half of the batter into the fruit-lined pan. Smooth the top, using an offset spatula, and sprinkle ever the streusel, keeping a little in reserve for decoration the finished cakes. Top with the remainder of the better, smoothing it with the spatula, an place the pan on a jelly-roll pan. Bake in the 350 degree oven for 45-50 minutes, or until golden and a toothpick inserted in the center comes out clean. Remove the cake to a cooking rack and let it cool for at least 25 minutes before inverting onto a cardboard cake round or a serving platter.
Serve the cake with ice cream or lightly sweetened whipped cream if desired and a sprinkle of the remaining streusel.
Storing: The cake is best served just warm or at room temperature the day it is made. However, you can cover the cake and keep i t at room temperature over-night.
Makes 8-10 servings. Contributing baker, Mary Bergin

chifon-cake-1-2
The cake is just as it's described in Baking with Julia. It's light, buttery and delicious. The streusel and peaches were a perfect pair. I hope you'll try this recipe. Try a new recipe, be fearless and have fun!

chifon-cake-2-6
Snickerdoodles
Happy Labor Day! No matter what or how you're celebrating, happy day to you. Is it really time to stop wearing white pants and put away summer purses? Is that still a rule?
Here in Wisconsin, many schools start after Labor Day. It was mostly due to farming, but now it's mostly due to tourism wanting to keep high school and college employees through the holiday weekend. My college student employees are starting an returning to school this week. I'll miss them very much. I loved their bright, happy, eager and always cool personalities. Their absence will give me time to rid my vocabulary, of really, and seriously-right? I guess those are better, than like!
I'd like to sent them off with some cookies. They've all got the bug to bake, and now they can stop by anytime to grab the recipe. Here's a good, old fashioned, get-a-glass-of-milk cookie, Snickerdoodles.

Snickerdoodles
The cookies made by whipped together soft butter and sugar, adding the vanilla and cinnamon, then the egg.

ingredients-1
After the butter and sugar are creamed/whipped together, add the cinnamon and vanilla. Adding it now will increase the flavor of the two spices. Then add the egg, and mix well.
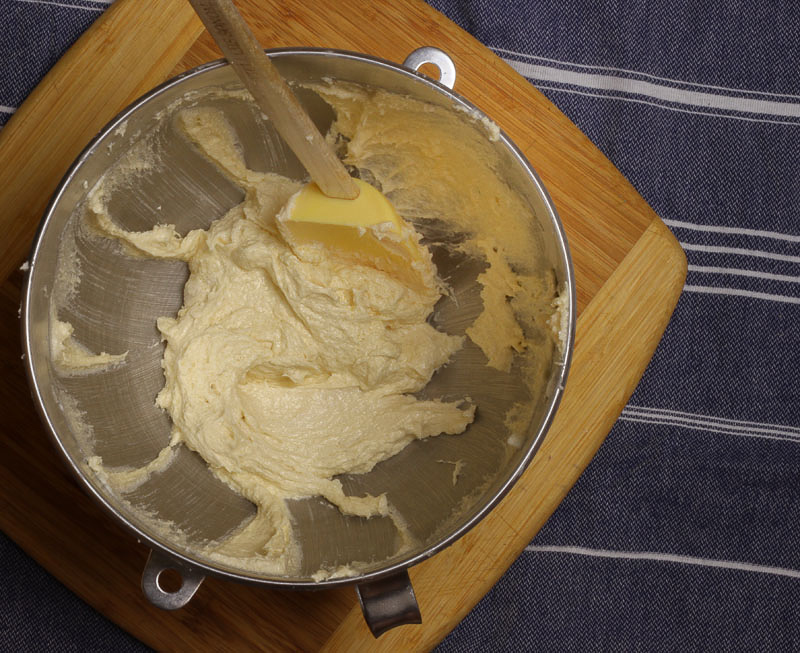
butter-and-sugar-1
Lastly, add the dry ingredients, and stir to mix. Don't overmix, you want your cookies to be crisp and crumbly, not bready.

dough-2
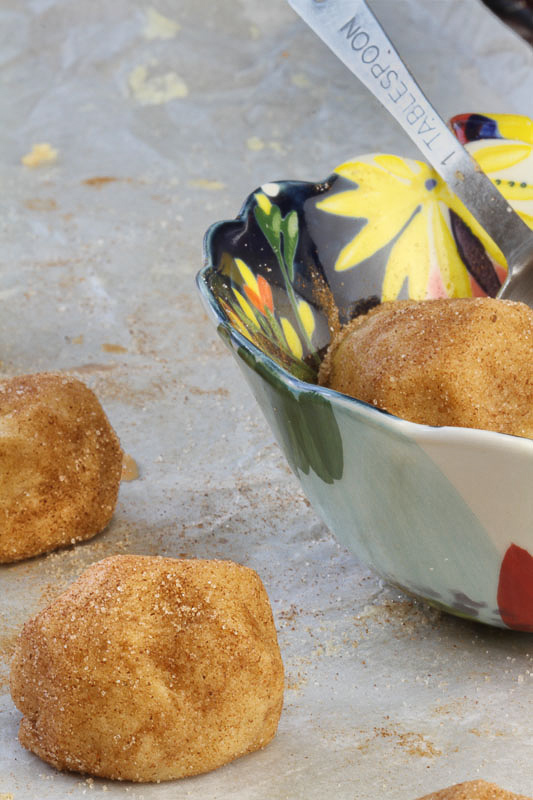
Now into the frig for 1/2 hour. Please don't skimp on this part. If you do, the cookies will spread too fast and be a big mess on the baking sheet. The chill will slow them down and they'll be just right. If you wait to turn on your oven, you'll have no other choice than to wait! Roll the dough into little balls, and then roll in cinnamon and sugar.
dough-balls-3
Then into the oven for 10-12 minutes. I like mine more on the crunchy side so I went with 12 minutes at 375 degrees F. Let them cool as long as you can stand it, and enjoy! Have a great school year or wherever your life may be taking you. Thanks to Jess, Orla, Phoebe, and Stacey for a fabulous summer!
To print this recipe, click HERE
Snickerdoodles
3 cups flour
2 tsp cream of tartar
1 tsp baking soda
1/4 tsp salt
1 3/4 cup sugar (divided)
2 sticks (16 Tbsp) butter, unsalted at room temperature
5 tsp cinnamon (divided)
1 1/2 tsp vanilla extract
2 eggs
In a standing mixer bowl, or with a hand mixer beat the butter and 1 1/2 cups sugar until it's pale and fluffy, about 2 minutes, then add 2 tsp cinnamon and vanilla and beat about 1 minutes longer. Scrape side of bowl a few times to make sure all the butter is combined. Add the eggs and mix completely.
Add the dry ingredients and stir gently to combine. Don't overmix. Refrigerate the dough while the oven is preheating.
Preheat your oven to 375 degrees F. Center the rack.
Roll the dough into walnut (1 TBSP) sized balls, and roll in the remaining sugar and cinnamon, which you've mixed together.
Set on a parchment-lined baking sheet about 2 inches apart. Bake for 10-12 minutes, or until golden brown. Move to a wire rack to cool, then store in an air tight container for up to three days.
Makes about 48 cookies. Adapted from Saveur, The New Comfort Food.

snickerdoodles
Minted Zucchini Tagliatelle with Cucumbers and Lemon
I love ribbon. Satin, paper, wired, grosgrain. It doesn't matter the kind. In my pastry kitchen I have spools and spools on a dowel to tie around cake boxes. Each ribbon is "frenched" to add the little notch at the end. Love it. Add tissue paper and a nice sticker and I'm all yours. When I read the title to the recipe, I honestly thought that we were going to make a pasta dish. Oh contraire! The tagliatelle are ribbons of zucchini. It was going to be just plain fun to make. Fun and really pretty. Plus, it's fresh, healthy and so lovely! Poor zucchini. It gets mispelled, and is one of the vegetables we're happy to see... for awhile. Then they end up in the office breakroom in a pile looking for good homes. Sometimes they even end up on your doorstep! With the help of a mandolin, the zucchini in this recipe is sliced into gorgeous ribbons. With the addition of simple lemon viniagrette, cucumbers, mint and lemon the ribbons become a beautiful salad. This week's French Fridays with Dorie recipe makes the zucchini the star. No mock apple pie, bread, pizza, just simple pretty zucchini.
I feel badly that I can't post the Around My French Table recipes on Fridays. If you've been following my blogs each Friday, you might want to take the plunge and buy the book - or check it out from the library, if you don't already have it. It's going to be a classic and I promise you won't be disappointed. Good news. I'll be making it up to you next Tuesday. It's a surprise!
When we were in San Francisco, in Chinatown, a shop keeper gave Gary a demo of some super sharp and cool garnishing tools. He bought three and has been eager to give them a try. Once I finished with my recipe he asked if he could use the left over pieces. A few minutes later he brought me the pretty carvings to garnish my plates. So pretty!
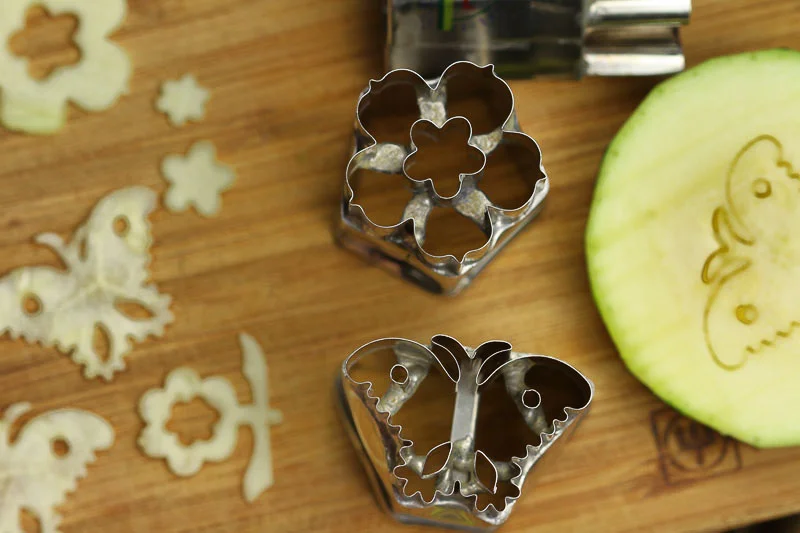
cutters-5

butterfly-3
The best tool for making the ribbons is a mandolin. It's a razor sharp blade to pass the vegetables over. I have great respect for mandolins. Injuries from them are deep, fast and almost always require a visit to the ER. They may perfect for the ribbon making, but only with the guard and slow careful movements. I'll tangle with the box grater, but never the mandolin. I got it out, was extra careful, and look at how great the zucchini turned out!

plated-zucchini-1
Embrace the gifts of zucchini, and enjoy the bounty of the summer harvest!
Stay tuned for a great dessert next week!
Peach Melba
Welsh Rarebit, Steak Diane, Pavlova and Peach Melba. All recipes we've heard of and maybe some of us can describe. Last week, the Around My French Table/French Friday's with Dorie group made Peach Melba. I was thinking of something crunchy. Perhaps in the Melba toast family. What is it you ask?
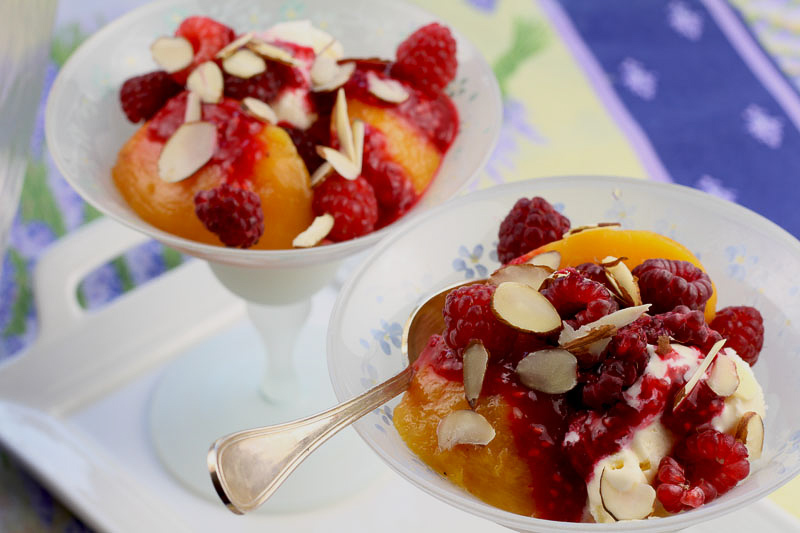
Think about the best peach you're ever tasted, with fresh raspberry sauce, over ice cream... with just a touch of liqueur. Yes, that's it.
Fresh peaches are poached in simple syrup with vanilla bean, then cooled and chilled. While the peaches are chilling, the berries are pureed and combined with just a bit of the syrup. It's that easy.
Once the sauce and peaches are ready, spoon over vanilla cream and add some sliced almonds. The scent of the vanilla is amazing. I used St. Germain, and elderflower liqueur rather than the Chambord that was suggested in the recipe. I don't think you can go wrong with either. As summer transitions into fall, this is the perfect summer comfort food. I hope you'll try it, and enjoy the sweetness of this classic.

Salsa of the Tropics
This is a great time of year. Gardens are pumping out tomatoes, green peppers, onions, and spicy jalapenos just to name a few garden favorites. I've got a favorite recipe for you. It calls for mangos, but today I used peaches. You can mix it up and use both if you have them. It's SO easy! All you have to do is chop. Peaches will be the theme for the next week of so. We made a road trip to North Carolina last week and picked up 12 boxes. We were in Asheville last year at this time and discovered the farmers' market, and the rows and rows of peaches. This year we made the journey to fill the car. I guess it kind of makes them local... to someone! I can happily report that all the boxes found homes.

Ready for the Heat
With the peaches that were a little bumped and bruised, I made the salsa. Feel free to adjust the heat with the jalapeno. I like to serve this with tortilla chips, but it's also great on pork tenderloin... hot off the grill.

Ingredients for perfect salsa
To print this recipe, click HERE
Salsa of the Tropics
Based on recipe from Great Good Food
1-2 mangos, chopped (or 2 peaches)
2 tablespoons fresh lime juice
1 cup chopped green, red or yellow bell pepper 1/2 teaspoon salt- or to taste 5-6 cup plum tomatoes, chopped
1 TBSP cumin 1 medium red onion, chopped
1 chopped jalapeno pepper
1-2 tsp. Sugar
1 TBSP vinegar
Stir together all the ingredients in a medium sized bowl. Cover and chill a few hours before serving.

Peach Salsa and Chips